


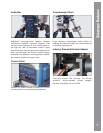
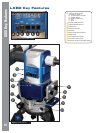


D. Handbox (HBX) Port
E. Aux 1
F. Aux 2
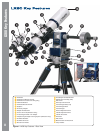
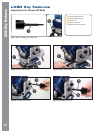
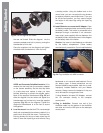
2) Counterweight Safety Cap: Prevents the
counterweight from accidentally slipping off the
end of the counterweight shaft.
2! Counterweight Shaft: Slide the counterweight
onto this shaft (below). The shaft is composed
of 3 segments which can be added or removed
as needed.
2@ Counterweight: Counterbalances the weight of
the optical tube, and adds stability to the mount.
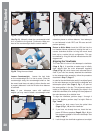
2# Azimuth Lock Knobs:
Alt-Az Mode: Keep in the “Lock” Position.
Equatorial Mode: Unlock while making
adjustments. Once aligned on the celestial pole,
move the knob to the “Lock” position to prevent
unwanted movement.
2$ Azimuth Adjustment Drive: Once the azimuth
lock knob is loosened, make adjustments to the
mounts azimuth position aligning it to the celestial
pole. When properly adjusted, lock the azimuth
adjustment lock knob to prevent unwanted
Azimuth movement in the LX80.
2% Latitude Adjustment Drive: Used to set
the LX80 to the correct Latitude for your
observing site.
2^ Latitude Lock: Before using the latitude
adjustment, loosen the latitude lock. Once the
latitude is adjusted, be sure to lock this to prevent
unwanted movement of the LX80.
2& Latitude Pivot Point: Keep in the lock position
to stabilize the mount.
2* Latitude Scale: Set the latitude of the
observing site on this scale using the latitude
adjustment drive.
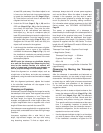
2( RA Clutch: Rotate this lever to engage the
RA drive.
3) DEC Clutch: Tighten to engage the DEC drive.
3! LX80 Multi-Function Hex Head Tool: adjust
the latitude lock, latitude drive, azimuth drive and
latitude pivot points. See page 12 for details.
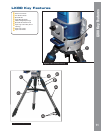
3@ Bubble Level: Level the mount with this tool.
3# LX80 Carry Handles: Use these carry handles
to help move the LX80 mount from one location
to another.
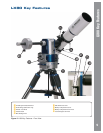
3$ DEC Setting Circle.
3% DEC Reference Point.
3^ True North Indicator: Point this arrow towards
true North.
3& AZ and EQ Home Position: Line the AZ or EQ
marks to set the telescope in altazimuth (AZ) or
equatorial (EQ) home positions
3* AZ Home position reference point.
3( EQ Home position reference point (Not
Visible).
4) Battery Compartment Cover:
4! Battery Compartment Lock Knob.
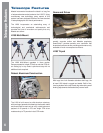
4@ Spreader Bar: Holds the tripod legs securely
in place and also acts as a holder for
extra eyepieces.
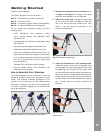
4# Tripod Mounting Base: Set the telescope
mount into the tripod mounting base and secure
into place using the the tripod lock knobs. See
How to Assemble Your Telescope, Page 15 for
more information.
4$ Variable Height Tripod Legs (3): Supports the
telescope mount. The mount attaches to the top
of the tripod.
4% Spreader Bar Tension Knob: Tighten to secure
the spreader bar against the tripod legs.
4^ Tripod Leg Lock Knobs (two on each leg):
Loosen these knobs to slide the inner leg
extension. Tighten the knobs to a fi rm feel to lock
in the height of the tripod.
4& Tripod Leveler: Twist to fi ne tune each tripod’s
leg height up or down.
4* Tripod Lock Knobs:: Securely hold s the mount
to the tripod
4( Counterweight Lock Knob: Secure the
counterweight’s position on the shaft.
AudioStar #497 HANDBOX
LX80 Key Features
14