


6 Toll Free Hot Line: 1-800-521-8559
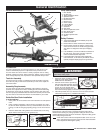
Felling a Tree
Felling is the term for cutting down
a tree. Small trees up to 6-7'' (15-
18cm) in diameter are usually cut in
a single cut. Larger trees require
notch cuts. Notch cuts determine
the direction the tree will fall.
CAUTION: If felling a tree on
sloping ground, the chain saw
operator should keep on the
uphill side of the terrain, as
the tree is likely to roll or slide
downhill after it is felled.
Direction of fall (B) is con-
trolled by the notching cut.
Before any cuts are made,
consider the location of larg-
er branches and natural lean
of the tree to determine the
way the tree will fall.
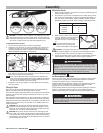
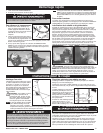
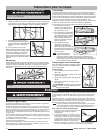
General Guidelines for Felling a Tree:
Normally felling consists of 2 main cutting operations, notching (C) and
making the felling cut (D).
Start making the upper notch cut (C) on the side of the tree facing the
felling direction (E). Be sure you don’t make the lower cut too deep into the
trunk.
The notch (C) should be deep
enough to create a hinge (F) of suffi-
cient width and strength. The notch
should be wide enough to direct the
fall of the tree for as long as possi-
ble.
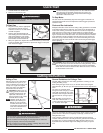
Make the felling cut (D) from the
other side of the tree and 1.5'' - 2.0''
(3-5cm) above the edge of the notch
(C) as shown to the right.
Never saw completely through the trunk. Always leave a hinge. The hinge
guides the tree. If the trunk is completely cut through, control over the
felling direction is lost.
Insert a wedge or felling lever in the cut well before the tree becomes
unstable and starts to move. This will prevent the guide bar from binding in
the felling cut if you have misjudged the falling direction. Make sure no
bystanders have entered the range of the falling tree before you push it
over.
NOTE
Cutting Instructions
A retreat path (A) should be planned and cleared as necessary before
cuts are started. The retreat path should extend back and diagonally to
the rear of the expected line of fall, as illustrated above.
Do not cut down a tree during high or changing winds or if there is a
dan-ger to property. Consult a tree professional.
Do not cut down a tree if there is a danger of striking utility wires; notify
the utility company before making any cuts.
3/4
1/4
E
C
F
D
Never walk in front of a tree that has been notched.
1.5-2''
3-5cm
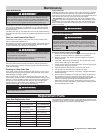
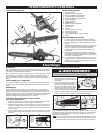
1. PLEASE READ ALL WARNINGS.
2. Make sure oil reservoir is full.
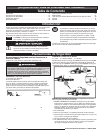
To Start Saw
3. Plug the cord (A) into the appropriate
size extension cord (B). Plug the
extension cord into a 110/120 volt AC,
15 AMP receptacle.
4. Grip the saw with both hands, left
hand holding the front handle and the
right hand holding the rear handle.
Thumbs and fingers should encircle
both handles as shown below left.
5. With your right thumb, depress the LOCK/OFF button (C) on the side
of the rear handle. At the same time, squeeze the trigger. To stop the
saw, release the trigger.
It is not necessary to maintain pressure on the LOCK/OFF button
once the trigger is squeezed and the motor is running. The
LOCK/OFF button will have to be depressed and the trigger
squeezed to restart the motor.
To Stop Motor
The saw motor will automatically stop when the trigger is released. The
LOCK/OFF button will have to be depressed and the trigger squeezed to
restart the motor.
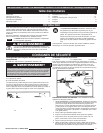
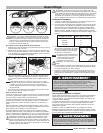
Chain and Bar Lubrication
Adequate lubrication of the saw chain during cutting operations is essential
to minimize friction with the guide bar. Your chain saw is equipped with a
manual oiler. Priming can increase the flow of oil to the bar. To prime the
chain saw press on the oil cap as shown below. Do not prime the oiler
while chain saw is running. Tilt the chain saw bar down slightly while press-
ing the manual oiler for the best results. The oil tank level can be checked
in the inspection slot (D) provided on the left side of the saw. Tank is full
when oil is at top of the slot. Always use a funnel when filling the oil tank.
Thoroughly clean all excess oil off the chain saw housing and hand grips
before operating.
CAUTION: Never starve the bar and chain of oil. Running the saw
DRY or with TOO LITTLE OIL will decrease cutting efficiency, shorten
saw chain life and cause rapid dulling of the chain and overheating
which dulls the chain and wears the bar. When this occurs, smoke or
bar discoloration can be seen.
NOTE
Quick Start
A
B
C
D
Ensure the extension cord is of the proper size and type for your
saw. Make sure the extension cord does not come in contact with
the guide bar and saw chain.
B
A