


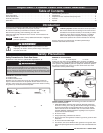


4 Toll Free Hot Line: 1-800-521-8559
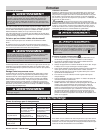
Introduction
This unit is designed for occasional homeowner use and should not be
used for commercial purposes or subjected to heavy continuous use.
Your new chain saw can be used for a variety of projects such as cutting
firewood, making fence posts, felling small trees, limbing, pruning at ground
level, and light carpentry. Cut only wood or wood products with your saw.
Tools for Assembly
Your User’s Kit may contain a combination wrench/screwdriver (scrench)
and is the only tool you will need to assemble your unit and to adjust the
saw chain tension.
Assembly Requirements
Your new chain saw will require installation of the guide bar, saw chain,
sprocket cover, adjustment of chain, and filling the oil tank with lubricating
oil, before the unit is ready for operation. Do not start the saw motor until
the unit is properly assembled. Read all instructions carefully. Do not install
any other size bar and chain than what is recommended for your model.
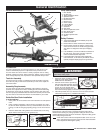
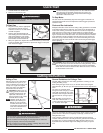
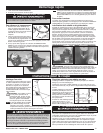
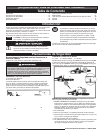
Guide Bar/Saw Chain Installation
To Install Guide Bar
1. Place power unit on flat surface and remove bar bolt nuts and sprocket
cover.
2. Using a straight screwdriver or the scrench, if provided in your User’s
Kit, turn the chain adjustment screw (A) counterclockwise as far left as
it will go, or until the Tang (B) (projecting prong) is to the end of its trav-
el.
3. Place the slotted end of the guide bar over the bar bolts so the Tang
(B) fits into the lower hole (C) in the guide bar (D).
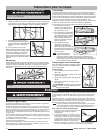
To Install Saw Chain
1. Spread the chain out with the cutting
edges (E) of the chain pointing in the
DIRECTION OF ROTATION.
2. Place the chain over the sprocket (F)
with drive links fitting between sprock-
et teeth. Guide the chain links into the
groove (G) on the top side of the
guide bar and around the nose. The
saw chain will droop slightly on the lower part of the guide bar.
3. Install the sprocket cover (H). Place the cover over the 2 bar bolts.
Thread the retaining nuts (J) FINGER TIGHT ONLY.
SAW CHAIN TENSION ADJUSTMENT
Proper tension of the saw chain is extremely important and must be
checked before starting any cutting operation. Taking the time to make
needed adjustments to the saw chain will result in improved cutting perfor-
mance and prolonged chain life.
A new chain and bar will need readjustment after as few as 5 cuts.
This is normal during the break-in period, and the interval between
future adjustments will lengthen quickly.
NOTE
Assembly
A
B
C
D
E
F
G
H
J
Whenever handling the saw chain, wear work gloves for protection
against sharp cutting edges.
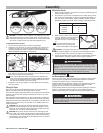
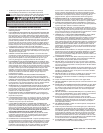
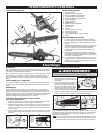
General Identification
General Identification
1
4
6
5
2
7
3
8
9
12
15
13
10
11
14
Parts Identification
1. Rear Handle
2. Oil Tank Cap
3. Trigger Start/Stop Switch
4. Sprocket Cover
5. Bar Retaining Nuts
6. Electric Motor
7. Electric Cord
8. Chain Catcher
9. Lock/Off Button
10. Front Handle
11. Guide Bar
12. Saw Chain
13. Tension Adjustment Screw
14. Rear Hand Guard
15. Guide Bar Nose
16. Oil Tank Inspection Slot
17. Spikes
Safety Features
3 Trigger Start/Stop Switch immediately stops saw
motor when released.
6 Electric Motor is double insulated for added safety.
8 Chain Catcher reduces the danger of injury in the
event saw chain breaks or derails during operation.
The catcher is designed to intercept a whipping
chain.
9 Lock/Off Button prevents accidental acceleration of
the saw motor. The trigger cannot be squeezed
unless Lock/Off button is depressed.
12 Low-Kickback Bar and Chain helps significantly
reduce kickback, or the intensity of kickback, due to
specially designed depth gauges and guard links.
16
17