-- 7 --
ASSEMBLY
Rib
Groove
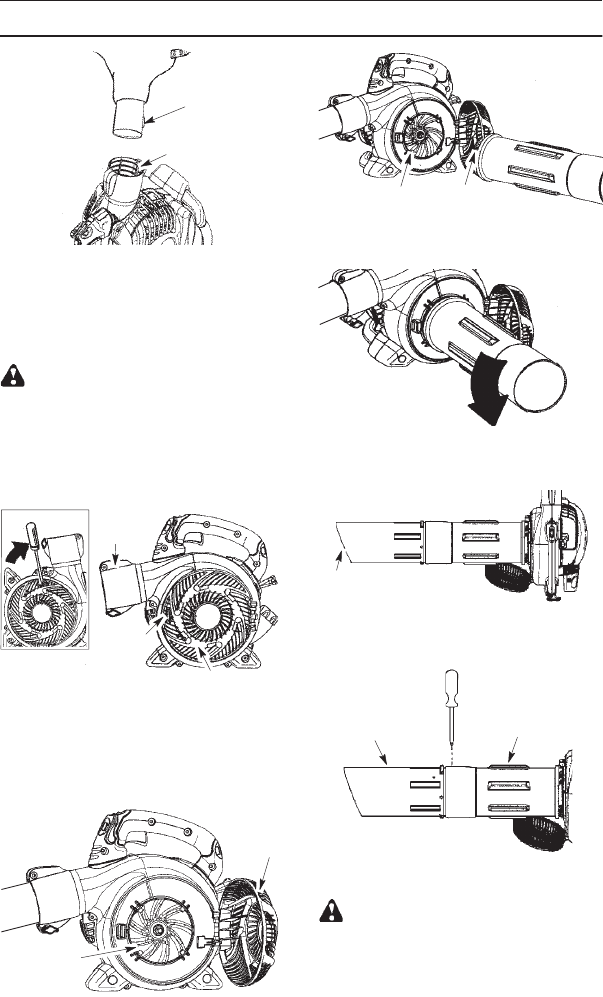
5. Inserttheelbowtubeintothebloweroutlet.
Make sure elbow tube rib is aligned with
the blower outlet groove.
6. Turnknobclockwisetosecureelbowtube.
VACUUM TUBE ASSEMBLY
WARNING: Stop engine and be sure
the impeller blades have stopped turning be-
fore opening the vacuum inlet door or at-
tempting to insert or remove the vacuum or
blower tubes. The rotating blades can cause
serious injury.
1. Insert thetipofascrewdriver intothelatch
area of the vacuum inlet.
Latch
Area
Blower
Outlet
Latch Area
Vacuum Inlet Cover
2. Gentlytilt thehandleofthe screwdriverto-
ward the front of the unit to release the
latch while pulling up on the vacuum inlet
cover with your other hand.
3. Holdthevacuum inletcover openuntilup-
per vacuum tube is installed.
V
acuu
m
Inlet
Cover
Vacuum
Inlet
4. Alignthetabsontheinsideofthevacuumin-
let with the slots on the upper vacuum tube.
Tab
Slot
5. Push the upper vacuum tubeinto the vac-
uuminlet. Turn the tubecounterclockwise
until a click is felt to secure the tube to the
blower unit.
6. Alignslantedendof lowervacuumtubeas
shown. Push lower vacuumtube intoupper
vacuum tube until the lowertube is securely
seated in the upper tube (about 7 cm).
Slanted end of
lower vacuum tube
7. When vacuum tubes are fitted together,
locate the label on the lower portion of the
upper tube. Permanently assemble the two
tubes together with the supplied screw.
Upper
Vacuum
Tube
Lower
Vacuum
Tube
HOW TO CONVERT UNIT FROM
VACUUM USE TO BLOWER USE
WARNING: While blowing debris,
holdtheunitwiththe muffler sidefacingaway
from your body and clothes (see OPERAT-
ING POSITION).
1. Remove the elbow tube and vacuum bag
by turning the knob counterclockwise to
loosen the elbow tube.
2. Remove the vacuum tubes by turning the
tubes clockwise.


