


7
6/26/02
SPS20 & SPS30 Series Pulverizer Seeders 313-242M
Section 2 Operating
Land Pride
Tractor Requirements
This Pulverizer Seeder is designed for tractors in the
Category 1 class. Horsepower rating of the tractor should
not exceed 40 HP.
Adequate front end weight is required on tractors for use
with the seeder. Check tractor’s 3-point lifting capacity.
Refer to “Section 5 Specifications and Capacities” on
Page 22 for seeder weight.
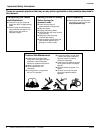
Operating Check List
In addition to design and configuration of equipment;
hazard control and accident prevention are dependent
upon the awareness, concern, prudence and proper
training involved in its operation, transport, maintenance
and storage of equipment. Before beginning to operate
your Seeder, the following inspection should be
performed.
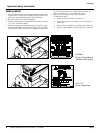
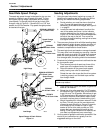
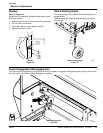
Tractor 3-Point Hookup
1. Back tractor up to seeder until 3-Point links are
aligned with hitch clevises on seeder.
2. Secure the tractor’s 3-Point lower links to the lower
hitch clevises using 7/8” diameter hitch pins on the
SPS3072 and secure to the lower hitch pins on the
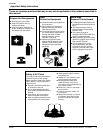
Check Reference
Read and follow the “Safety Rules”
carefully.
Important Safety
Information Page 1-
6
Read all of the "Tractor Hook Up" and
preparation instructions.
Section 2
page 7
“Basic Operations” in this Manual Operator’s
Manual
Lubricate the seeder as needed. Refer to
"Lubrication"
Section 4
page 20
Check theseeder initially and periodically for
loose bolts & pins, "Torque Values Chart".
Section 8
page 26
Make sure all guards and shields are in
place.
Operator’s
Manual
Checkinitiallyand periodicallyforloosebolts,
pins, and chains.
Operator’s
Manual
Inspect the feed cups and seed tubes for
foreign matter.
Section 7
page 25
Set speed change sprocket for drive type
desired.
Section 3
page 9
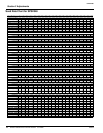
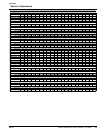
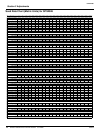
Set seed rate. See "Seed Rate Charts". Section 3
page 12
NOTE: In order to maintain steering control, ballast
may have to be added to your tractor. To determine
whether or not to add ballast, refer to your tractor
operator’s manual.
SPS2048.
3. Secure the tractor’s top link to the seeder top hitch
using a 1” diameter hitch pin. Adjust tractor top link in
order to level the seeder.
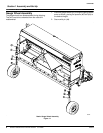
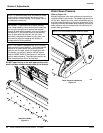
Seeder Preparation and Use
Before proceeding with the first time setup, or before
making any adjustments mentioned in this section, make
every effort to obtain and hitch a tractor to the seeder.
1. This seeder can be transported with a full box of seed.
It is best not to do this unless necessary because the
increased weight does increase the chances for
problems on the road. Do not exceed 20 miles per
hour.
2. Calibrate your seeder for a proper rate based on the
seed you are using. Calibration information is located
on the inside of your box lid or on page 9.
3. Make sure the feed cup door adjustment handle on
each cup is set the same across the seeder.
4. Never allow anyone to ride on the seeder.
5. Maximum seeding speed will vary according to soil
conditions.
6. Check that all plugs and caps have been replaced
properly.
7. Be sure all bolts and nuts are tight.
8. Be certain all guards are in place and secure.
9. Clear the area to be seeded of rocks, branches and
other foreign objects.
10. To begin seeding lower unit to the ground.
11. At first begin seeding at a slow forwardspeed and shift
up until the desired speed is achieved.
12. Periodically check that seed is being distributed
through the feeder cups.
Transporting
!
CAUTION
When traveling on public roads whether at night or during the
day, use accessory light and devices for adequate warning to
operators of other vehicles. Comply with all federal, state and
local laws.
1. Select a safe ground travel speed when transporting
from one area to another. When traveling on
roadways, transport in such a way that faster moving
vehicles may pass you safely.
2. Reduce tractor ground speed when turning. Leave
enough clearance so the seeder does not contact
obstacles such as buildings, trees or fences.
3. When traveling over rough or hilly terrain, shift tractor
Section 2
Operating