


Section 3: Operating
PSN2096 Primary Seeders 313-306M
4/03/08
Land Pride
14
Table of Contents
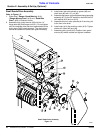
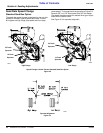
General Description
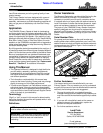
The following information is a brief description of how this
Primary Seeder works. It is included to help you
understand the operation of this seeder.
The power to drive the seeding function of this seeder
comes from the ground speed of the tractor. The seed
metering is powered by the front roller at a rate
proportional to the distance driven. This ensures that the
rate applied in pounds per acre or pounds per 1000
square feet remains constant as ground speed is varied.
The poweris transmittedvia drive chainsto the seedcups.
This drive can be adjusted to a high or low range to
broadcast more or less seed. The seed rate is adjustable
using the seed rate lever located at the rear of the seeder.
The seed is dropped between cast iron rollers. The front
roller crushes clods, presses down small stones and
forms a firm seedbed. The rear roller firms the soil around
the seeds.
Operating Check List
In addition to design and configuration of equipment,
hazard control and accident prevention are dependent
upon the awareness, concern, prudence and proper
training involved in its operation, transport, maintenance
and storage of equipment. Before beginning to operate
your Primary Seeder, the following inspection should be
performed.
Check Reference
Read and follow the “Safety Rules”
carefully.
Important Safety
Information
Read all of the “Tractor Hook-Up” and
preparation instructions.
Section 2
page 14
“Basic Operations” in this Manual Operator’s
Manual
Lubricate the seeder as needed. Refer to
“Lubrication”
Section 4
page 25
Check theseeder initially and periodically for
loose bolts & pins, “Torque Values Chart”.
Section 8
page 31
Make sure all guards and shields are in
place.
Operator’s
Manual
Checkinitiallyandperiodically forloose bolts,
pins, and chains.
Operator’s
Manual
Inspect the seed cups and seed tubes for
foreign matter.
Section 4
page 30
Set speed change sprocket for drive type
desired.
Section 3
page 17
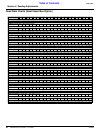
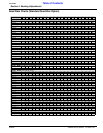
Set seed rate. See “Seed Rate Charts”. Section 3
page 17
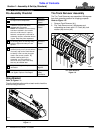
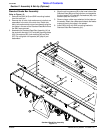
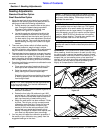
Seeder Preparation
Before proceeding with the first time set-up, or before
making any adjustments mentioned in this section, make
every effort to attach the seeder to a tractor.
1. This seeder can betransported with a full box of seed.
It is best not to do this unless necessary because the
increased weight does increase the chances for
problems on the road. Do not exceed 20 miles per
hour.
2. Calibrate your seeder for a proper rate based on the
seed you are using. Calibration information is located
on the inside of your box lid or on page 17.
3. Make sure the seed cup door adjustment handle on
each cup is set the same across the seeder.
4. Never allow anyone to ride on the seeder.
5. Maximum seeding speed will vary according to soil
conditions.
6. Check that all plugs and caps have been replaced
properly.
7. Be sure all bolts and nuts are tight.
8. Be certain all guards are in place and secure.
9. Clear the area to be seeded of rocks, branches and
other foreign objects.
10. At firstbegin seeding ata slowforward speed andshift
up until the desired speed is achieved.
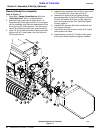
Tractor Requirements
This Primary Seeder is designed for tractors with a
3-point. Category 2or 3 and Cat. 2 Quick-Hitch.Check the
tractor’s 3-point lifting capacity. Refer to “Section 6:
Specifications and Capacities” on Page 28 for seeder
weight.
A Pull-Type hitch is available as an option. This Pull-Type
Hitch can be used with smaller HP tractors, which may not
have the necessary capacity to maneuver a 3-point
configuration.
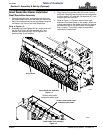
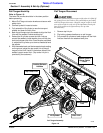
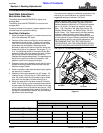
Tractor 3-Point Hook-Up
1. Back tractor up to seeder until 3-Point links are
aligned with hitch clevises on seeder.
2. Secure the tractor’s 3-Point lower arms to the lower
hitch clevises using hitch pins supplied.
3. Secure tractor’s top center link to the seeder top hitch
using a 1” diameter hitch pin.
4. With the seeder resting on level ground, adjust the
tractor’s top link until the seeder is level.
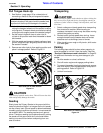
5. Remove rear roller lock pin from parking position and
place in storage position. Figure 2-1
NOTE: In order to maintain steering control, ballast
may have to be added to your tractor. To determine
whether or not to add ballast, refer to your tractor
Operator’s Manual.
Section 3: Operating