


7
Controller Mounting
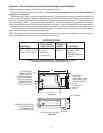
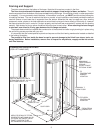
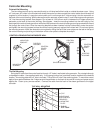
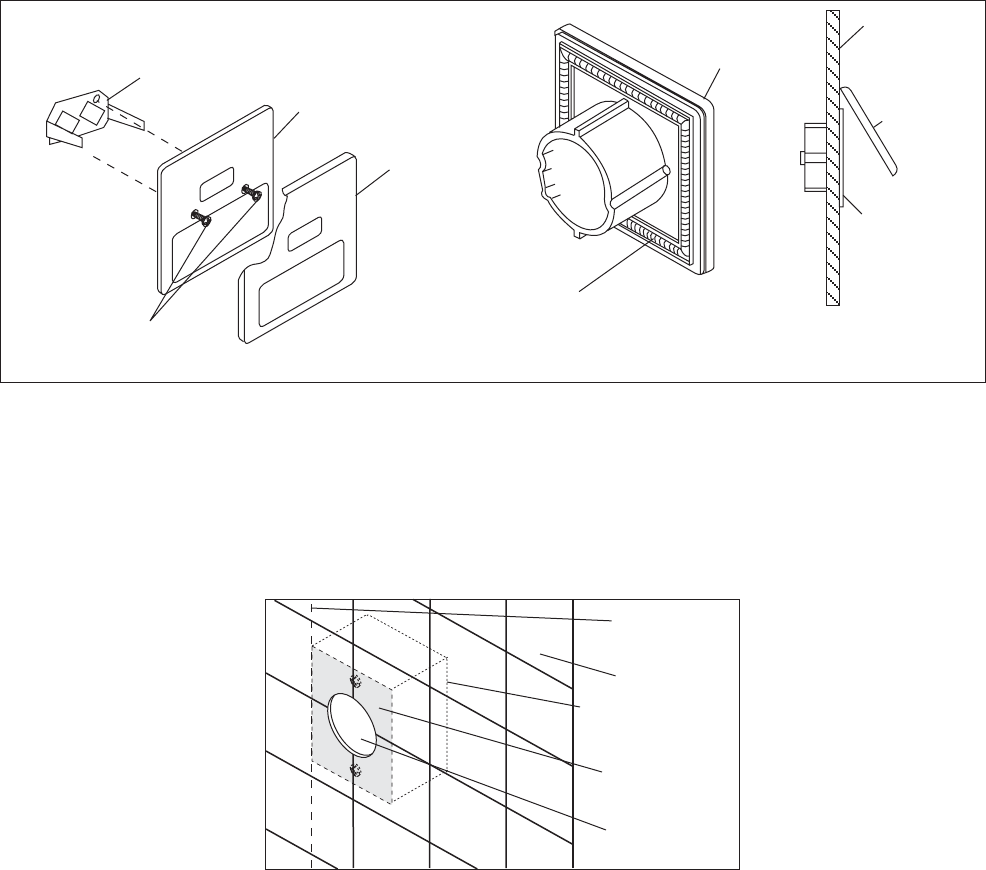
Finished Wall Mounting
The low voltage control can be mounted directly to a finished wall either inside or outside the steam room. Using
a 2" hole saw, drill a hole in the finished wall where the control is to be mounted (the control cable should already be
roughed-in to this location). Locate the control cable, pull it out through the 2" hole and plug it into the connector on
the back of the control housing. With the decorative cover removed, screw the two 3" control housing mounting screws
1/4" into the mounting bracket. See diagram. Run a bead of 100% silicon caulk in between the 2 ridges around the
perimeter on the back of the control housing. See diagram. Insert the mounting bracket into the wall cavity by first
pushing with the control housing and then with a hard flat surface on the control housing mounting screws which extend
out through the control face. Once the mounting bracket has been inserted into the finished wall, center the control
and tighten the mounting screws to draw the control housing securely against the finished wall. Do not over tighten
the mounting screws. Install the decorative cover plate by sliding the top of the cover plate over the tab on the top of
the control housing and pushing on the bottom of the cover plate to complete the snap fit.
CONTROLLER MOUNTING IN FINISHED WALL
SILICON SEALANT
WALL
CONTROL
COVER
PLATE
CONTROL
HOUSING
CONTROL
HOUSING
CONTROL
HOUSING
CONTROL
COVER
PLATE
MOUNTING
SCREWS
MOUNTING
BRACKET
TILE UP
TO 2" HOLE
TILE
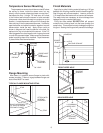
TILE WALL MOUNTING
MOUNTING
PLATE
SINGLE GANG
JUNCTION BOX
(PROVIDED)
STUD
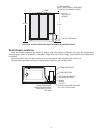
Tile Wall Mounting
String the 25' cable from the control location through 1/2" holes in wall studs to the generator. Do not staple through
or damage the cable. Use supplied cable only. A one gang junction box (provided) must be installed at the desired
location. A mounting plate with a 2" hole is included. Tile up to the 2" hole in the mounting plate. To mount the control
apply silicon sealant between the 2 ridges around the perimeter on the back of the control housing and press control
against tile. Clean up any excess sealant. Connect the cable from the back of the steam generator to the digital
controller.