


SKU 93889 For technical questions, please call 1-800-444-3353 PAGE 13
2. Before each use, inspect the general condition of the Pressure Blasting System
and its accessories. Check for loose screws, misalignment or binding of moving
parts, cracked or broken parts, damaged air hoses, and any other condition that
may affect safe operation. If abnormal noise or vibration occurs, have the problem
corrected before further use.
Do not use damaged equipment.
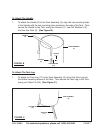
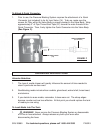
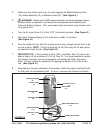
3. Before, during, and after use: Periodically, check the Water Trap (12) for
excessive water build-up. If necessary, hold a container beneath the Water Trap
and press the button located at the bottom of the Water Trap to drain the water.
(See Figure G.)
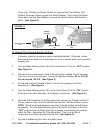
the compressor air hose from the Quick Connector on the Pressure Blasting
System.
4. To clean the exterior of the Pressure Blasting System, wipe with a clean,
damp cloth using a mild detergent or mild solvent. Do not immerse the tool in
liquids.
5. When storing, always store the Pressure Blasting System in a clean, dry, safe
location out of reach of children and other unauthorized people.
6. CAUTION! All maintenance, service, and repairs not mentioned in this
manual must only be performed by a qualified service technician.
PLEASE READ THE FOLLOWING CAREFULLY
THE MANUFACTURER AND/OR DISTRIBUTOR HAS PROVIDED THE PARTS LIST AND ASSEMBLY
DIAGRAM IN THIS MANUAL AS A REFERENCE TOOL ONLY. NEITHER THE MANUFACTURER OR
DISTRIBUTOR MAKES ANY REPRESENTATION OR WARRANTY OF ANY KIND TO THE BUYER THAT HE
OR SHE IS QUALIFIED TO REPLACE ANY PARTS OF THE PRODUCT. IN FACT, THE MANUFACTURER
AND/OR DISTRIBUTOR EXPRESSLY STATES THAT ALL REPAIRS AND PARTS REPLACEMENTS SHOULD
BE UNDERTAKEN BY CERTIFIED AND LICENSED TECHNICIANS, AND NOT BY THE BUYER. THE BUYER
ASSUMES ALL RISKS AND LIABILITY ARISING OUT OF HIS OR HER REPAIRS TO THE ORIGINAL
PRODUCT OR REPLACEMENT PARTS THERETO, OR ARISING OUT OF HIS OR HER INSTALLATION OF
REPLACEMENT PARTS THERETO.
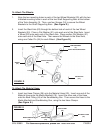
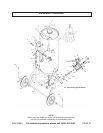
Metering Valve (18) and Air Input Valve (14) to the “OFF” position. Use the
Safety Valve (6) to release any remaining air pressure in the Tank Assembly (3).
Check to make sure the Pressure Gauge reads “0” PSI. Then, disconnect