


Setup
Setup
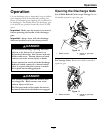
Assembling Discharge
Deector to OCDWB01
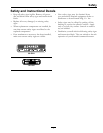
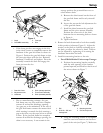
Insert the rod through the rst tab on the gate link
frame, discharge deector, and second tab on the gate
link frame (Figure 2). Orient and install the spring so
that the loop will rest in the notch on the discharge
deector. Continue to push the rod into the linkage
cover. Orient and install the hairpins into the ends of
the rod as shown in Figure 2.
Figure 2
1. Hairpin
6. Second tab
2. Rod 7. Linkage cover
3. Discharge deector 8. Spring
4. Gate link frame
9. Notch
5. First tab
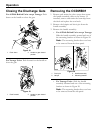
Installing OCDWB01 on
Mower Deck
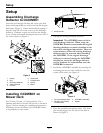
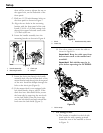
For 32 inch, 36 inch, or Vantage decks: Use a
hammer and chisel to knock out the tab, as shown in
Figure 3, before starting the installation instructions.
Knocking out the tab allows the OCDWB01 frame
to t properly to these decks.
Figure 3
1. Knock out tab
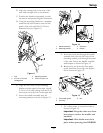
1. Flip up the existing discharge deector.
Important: The OCDWB01 comes with its
own discharge deector. When using the
OCDWB01, Exmark recommends the original
discharge deector to remain installed on the
unit and in the ipped up position. There are
some instances where the existing discharge
deector must be removed when installing
the OCDWB01. If the original discharge
deector is removed during the OCDWB01
installation, retain the discharge deector
and its hardware for reinstallation once the
OCDWB01 is removed.
2. Install the OCDWB01 assembly by inserting the
mounting pin into the tube welded to the rear
corner of the deck (see Figure 4).
Figure 4
1. Flip up discharge chute
3. OCDWB01 assembly
2. Mounting pin inserted
into deck tube
4. Rotate
3. Pivot the assembly towards the deck. The front
pin should engage into the slot in the deck as
shown in Figure 5.
8