


Design LED Par Zoom MH™
©Elation Professional 10 Design LED Par Zoom MH™
movement.
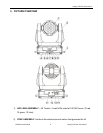
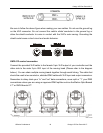
3) TRANSPORT HANDLE – This fixture contains a build-in carrying handle be sure to
always transport this fixture by the handle and never by grasping the head or yoke
assembly.
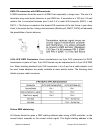
4) BASE ASSEMBLY – The main base holds the majority of the electronics and logic
boards. The base also provides a means to securely mount the fixture to the floor or
ceiling.
5) LED MENU DISPLAY – Four segment LED menu display, details all menu functions.
6) MODE/ESC BUTTON – This button is used to access and exit the fixture’s on-board
menu system.
7) UP BUTTON – This button is used to scroll forward when navigating through the
fixture’s menu system.
8) DOWN BUTTON – This button is used to scroll backwards when navigating through
the fixture’s menu system.
9) ENTER BUTTON – This button is used to select and confirm a menu function.
10) POWER SWITCH – This switch controls main power to the unit (if I have to tell you
that, you probably should not be using this fixture!).
11) POWER CONNECTION – This cable provides main power to your fixture. Always be
sure to use a properly grounded power cable. If this cable ever becomes frayed or
damaged this cable should be replaced immediately by a qualified technician.
12) FUSE HOLDER – This housing holds a 4A/250v GMA fuse and is designed to
protect the electronics in the event of severer power fluctuations. Never defeat this