


13
NOTE:
• Remove tape adhered to cutter, which cuts nylon cord,
on guard extension at the first use. (Fig. 20)
To remove the guard extension, apply a flat-blade
screwdriver into the notch on the guard, push it in and
meanwhile slide the guard extension.
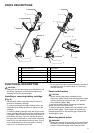
Installing the cutter blade
CAUTION:
• Be sure to use genuine Dolmar cutter blade.
• The cutter blade must be well polished, free of cracks
or breakage. If the cutter blade hits against a stone
during operation, stop the motor and check the blade
immediately.
• Polish or replace the cutter blade every three hours of
operation.
• Always wear gloves when handling the cutter blade.
• Always attach the blade cover when the machine is not
in use or is being transported.
• The cutter blade-fastening nut (with spring washer) is a
consumable part. If there appears any wear or
deformation on the spring washer, replace the nut. Ask
your local authorized service center to order it.
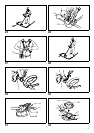
Turn the machine upside down so that you can replace
the cutter blade easily. (Fig. 21)
To dismount the cutter blade, insert the hex wrench
through the hole on the protector cover and gear case.
Rotate the receive washer until it is locked with the hex
wrench. Loosen the hex nut (left-hand thread) with the
socket wrench and remove the nut, cup, clamp washer
and hex wrench. (Fig. 22)
Mount the cutter blade onto the shaft so that the guide of
the receive washer fits in the arbor hole in the cutter
blade. Install the clamp washer, cup, and secure the
cutter blade with the hex nut with 13 to 23 Nm of
tightening torque during holding the receive washer with
hex wrench. (Fig. 23)
Make sure that the blade is the left way up.
Installing of nylon cutting head
CAUTION:
• Always mount not only guard but also guard extension
when using nylon cutting head.
• Be sure to use genuine Dolmar nylon cutting head.
• If the nylon cutting head hits against a stone during
operation, stop the motor and check the nylon cutting
head immediately.
Turn the machine upside down so that you can replace
the nylon cutting head easily. (Fig. 24)
Insert the hex wrench through the hole on the protector
cover and the gear case and rotate the receive washer
until it is locked with the hex wrench. Mount the nylon
cutting head onto the threaded spindle directly and tighten
it by turning it counterclockwise. Remove the hex wrench.
To dismount the nylon cutting head, turn the nylon cutting
head clockwise during holding the receive washer with
hex wrench.
OPERATION
Correct handling of machine (with bike
type handle)
Correct posture
WARNING:
• Always position the equipment on your right-hand side
so that the shaft of the left handle is always ahead of
you. The correct posture reduces the risk of injury
caused by kickback. (Fig. 25)
Fit the shoulder harness as shown and hang the machine
firmly on your right side so that the shaft of the left handle
is always ahead of you.
Attachment of shoulder harness (Fig. 26)
Wear the shoulder harness on your back and buckle it up
until a click is heard. Make sure that it cannot be taken off
with pulling it off. Hang the machine as shown.
Adjust the strap length so that the cutter blade will be kept
parallel with the ground at the level of 10 to 30 cm above
the ground.
Detachment (Fig. 27)
In case of emergency, press the lever of the buckle
strongly to take off the harness and the machine.
WARNING:
• Be extremely careful to maintain control of the
machine at this time. Do not allow the machine to
be deflected toward you or anyone in the work
vicinity. Failure to do so could result in serious injury.
Correct handling of machine (with loop
type handle)
Correct posture
WARNING:
• Always position the equipment on your right-hand side
so that the shaft of the barrier is always ahead of you.
The correct posture reduces the risk of injury caused
by kickback. (Fig. 28)
Fit the shoulder harness as shown and hang the machine
firmly on your right side so that the barrier is always ahead
of you.
Attachment of shoulder harness (Fig. 29)
Hang the shoulder harness on your left shoulder with
putting your head and right arm though it. Buckle it to the
hook unit until a click is heard. Make sure that it cannot be
taken off with pulling it off. Hang the machine as shown.
Adjust the strap length so that the cutter blade will be kept
parallel with the ground at the level of 10 to 30 cm above
the ground.
Detachment (Fig. 30)
In case of emergency, press the emergency detachment
lever strongly.
WARNING:
• Be extremely careful to maintain control of the
machine at this time. Do not allow the machine to
be deflected toward you or anyone in the work
vicinity. Failure to do so could result in serious injury.