


12
cannot be removed in spite of using the reversing
switch.
CAUTION:
• Always check the direction of rotation before operation.
• Use the reversing switch only after the equipment
comes to a complete stop. Changing the direction of
rotation before the equipment stops may damage it.
(Fig. 9 & 10)
This equipment has a reversing switch to change the
direction of rotation to remove weeds entangled on the
cutting tool. Depress the reversing switch lever from the A
side for counterclockwise (normal) rotation or from the B
side for clockwise (reverse) rotation.
In the reversing mode, the equipment automatically stops
in a short time after turned on.
Speed change (Fig. 11 & 12)
Two speed ranges can be preselected with the speed
change switch.
To change the speed range, turn the speed change switch
lever so that it points toward “1” for low speed or “2” for
high speed.
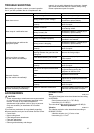
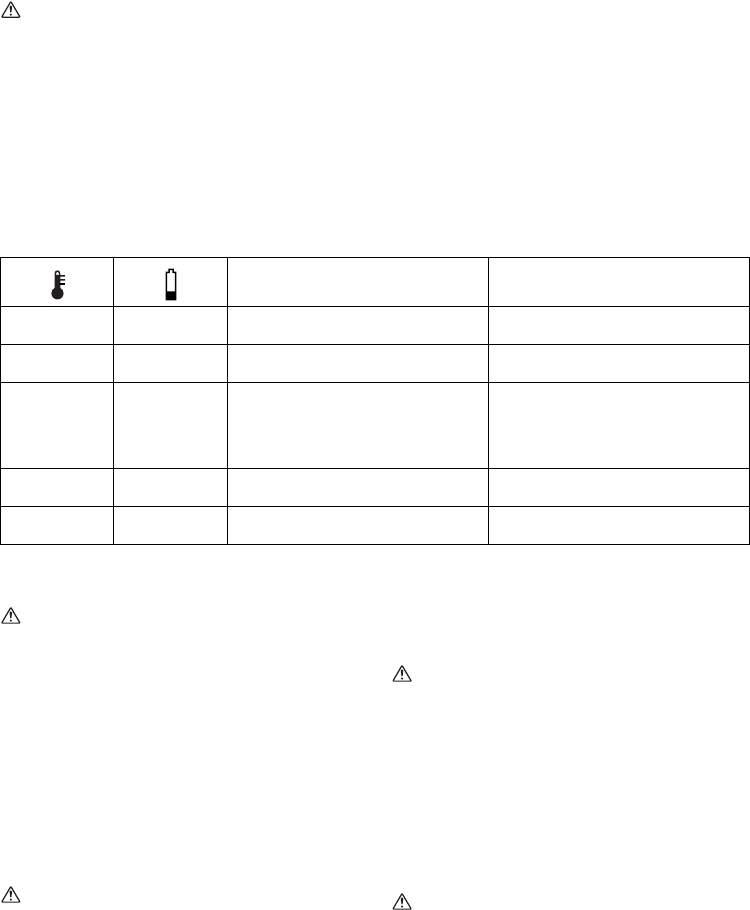
Battery/motor protection system
The battery cartridge and machine are equipped with
protection systems, which automatically reduces or cuts
off the output power for their long service life.
Under overloaded situation, the protector drops the
revolution to protect the motor. In this case, the following
two indication lamps do not light up or blink.
The other functions can be recognized by two indication
lamps as follows when working. (Fig. 13)
Nylon cutting head (optional accessory
for machines equipped with cutter blade)
CAUTION:
• Do not bump the head when it rotates greater than
4,500 min
-1
or it is stopped. (Fig. 14)
The nylon cutting head is a dual string trimmer head with
bump & feed mechanisms.
Bump the nylon cutting head against the ground to feed
out extra cord during driving the equipment. The cord will
be automatically cut to the appropriate length by the cutter
on the guard extension.
NOTE:
If the nylon cord does not feed out with bump, rewind/
replace the nylon cord by following the procedures
described under “Maintenance”.
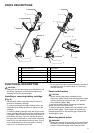
ASSEMBLY
CAUTION:
• Always be sure that the equipment is switched off and
the battery cartridge is removed before carrying out
any work on the equipment.
• Start the equipment only after having assembled it
completely.
Installing the handle (for bike handle type
model only) (Fig. 15)
Loosen knob.
Place handle between handle clamp and handle holder.
Adjust the handle to an angle that provides a comfortable
working position and then secure by firmly hand-
tightening knob.
Installing the guard (Fig. 16 & 17)
WARNING:
• Only the cutting tool/guard combinations as indicated
below must be used. Failure to do so can cause
serious injury. Never use the equipment without the
guard.
• The outside diameter of the cutter blade must be
230 mm. Never use any blade exceeding 230 mm in
outside diameter.
In use of the metal blade (Fig. 18)
Fix the guard to the clamp with two bolts as shown.
Tighten the right and left bolts evenly.
In use of the nylon cutting head
CAUTION:
• Take care not to injure yourself on the cutter for cutting
the nylon cord on the inside of the guard extension.
• Be sure to push in the guard extension until it is fully
inserted. (Fig. 19)
Fix the guard to the clamp with two bolts as shown.
Tighten the right and left bolts evenly.
Mount the guard extension by sliding it into place from the
flank of the guard as shown.
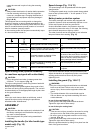
Status Action to be taken
- Blinking Battery power has been nearly used up.
Replace the battery with fully charged
one.
- Lighting On
Battery protector is shutting off the power
- battery power has been used up.
Replace the battery with fully charged
one.
Blinking -
Overload protector is shutting off the
power - the motor was locked.
Release the switch trigger and remove
the cause of the motor lock or overload.
If the cutting tool is locked by entangling
weeds or the like, always remove the
battery cartridge before clearing it.
Lighting On -
Overheat protector is shutting off the
power - overheating.
Rest the equipment for a while.
Blinking Blinking Electric or electronic malfunction
Ask your local authorized service center
for repairs.