


TORCH FUNCTION
GB
(GB) 4
GB
5.0 TORCH FUNCTION
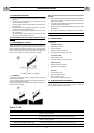
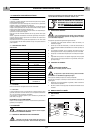
Start to cut slowly, then increase the speed to obtain the desired cut quality . To
start a cut on the sheetmetal border, align the center of the torch to the sheetmetal
and press the start button: the arc cut will start on the border. Regulate the speed
to obtain a good cut. Air plasma will create a straight arc (stainless steel alumi-
num) or, a 5° arc
Fig. E
(Soft steel). The arc varies depending on speed, material
and thickness.
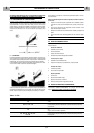
5.1 PERFORATION
In some cutting operations, it could be necessary to start the cut from a point dis-
tant from the border. The backfire from this operation could shorten the life of
torchs’ components. Therefore, it is suggested to do the job as fast as possible.
When doing a perforation (
Fig. F
).
Slightly incline the torch, so that backfire particles are blown away by the nozzle
(and by the operator) instead of bouncing back to the torch. Clean slag and
incrostations from the protection bush. Spraying or inmerging the protection
bush in an anti-slag substance, minimizes the quantity of incrostation that would
stick to it.
NOTE! The following suggestions should be taken in consideration for all cut-
ting operation.
a. After completion of all cutting operation, wait 5 minutes before shutting off
the generator. It will give the fan time to cool and disperd the equipments’
heat.
b. In order for components to last longer, don’t let the arc pilot “ON” longer
hen necessary.
c. Handle torch components with care and protect them from damages.
d. For material sostitution use only the safety tool.
READ FREQUENTLY OVER THE SAFETY PRECAUTIONS.
6.0 COMMON CUTTING DEFECTS.
Trouble shooting for arc cutting operations:
Insufficient penetration.
a. Cutting speed too fast.
b. Not enough power.
c. Excessive material thickness.
d. Torch components damaged or worn.
Main arc goes off.
a. Cutting speed too slow.
b. Nozzle too distant from workpiece.
Slag formation.
a. Wrong gas pressure.
b. Wrong cutting power.
Burned nozzle.
a. Current too high.
b. Nozzle damaged or loose.
c. Nozzle touching the workpiece
d. Excessive slag: low gas plasma pressure.
7.0 TROUBLESHOOTING
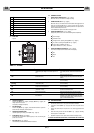
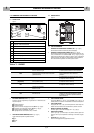
After starting, the power source may show operational errors on the display (
Ref.
3
- Fig. 1 page 2) , as shown in the table below. These errors can be remedied or
are irreversible.
Table n° 2 - FAIL -
DISPLAY
RESETTING
F14
Make sure that the cap is properly inserted.
Switch the power source off and then on again.
F10 - F11 - F12 - -F13
Switch the power source off and then on again.
If the "fail" persists call the assistance centre
and communicate the type of error.
F 15
Make sure that the torch button is
not pressed when switching the power source on.
Switch the power source off and then on again.
F20 - F30 - F51 - F52 - F53 - F54 -F55 - F56
Switch the power source off and then on again.
If the “fail” persists call the assistance centre
and report the type of error.