


• Engagethe traction drive lever as shown
in next figure, left hand. As the snow
thrower starts to move, maintain a firm
hold on the handles, and guide the snow
thrower along the cteadng path. Do not
attempt to push the snow thrower.
• To move the snow thrower backward,
move the speed shifter lever into first or
second reverse and engage the traction
drive lever (left hand).
IMPORTANT: Never move the speed shifter
lever while the traction lever is down.
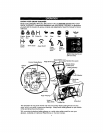
TO THROW SNOW
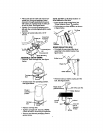
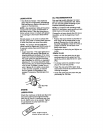
• Push down the auger drive lever, see fig-
ure below, release to stop throwing snow.
TractionDriveLever AugerDrive Lever
Left hand t / Righthand
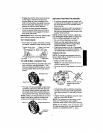
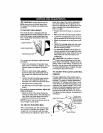
TO USE WHEEL LOCKOUT PIN
• The left hand wheel is secured to the axle
with a klick pin, see figure below. This
unit was shipped with this klick pin in the
locked position (klick pin through hole in
wheel).
!-Wheel Drive
Locked
__ Position
K'ick Pin/ I_1_1
• For ease of maneuverability in light snow
conditions, disconnect the klick pin from
the wheel locked position and push into
the single wheel drive position (klick pin
through axle hole only), see figure below.
NOTE: Make sure that the klick pin is in the
single wheel drive position, through axle
only and not through the hole in wheel.
KlickPin_ SingleWheel Drive
BEFORE STARTING THE ENGINE
• tf the snow thrower must be moved with-
out the aid of the engine, it is easier to pull
the snow thrower by the handles rather
than pushing.
• Before you service or start the engine, fa-
miliarize yourself with the snow thrower.
Be sure you understand the function and
location of all controls.
NOTE: Check tension of clutch cables be-
fore starting the engine (See To Adjust The
Control Cables paragraph on page 19).
• Be sure that all fasteners are tight.
• Make sure the height adjust skids are
properly adjusted (See To Adjust Skid
Height paragraph on page 18).
• Checktire pressure (14 to 17 pounds).
See side of tire for maximum inflation. Do
not exceed listed maximum pressure.
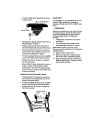
CHECKTHE OIL
NOTE: The engine was shipped from the
factory filled with oil. Check the level of the
oil. Add oil as needed,
• Make sure the unit is level.
NOTE: Do not check the level of the oil
while the engine runs.
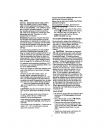
• Remove the oil fill cap/dipstick. Check the
oil.
I
tL
_Oil Fill/Dipstick
;,_,.,' NOTE: Oil level mustbe
._) between full and add
mark.
• If necessary, add oil until the oil reaches
the FULL mark on the oil fill cap/dipstick
(see figure above). Do not add too much
oil.
• Tighten the fill cap/dipstick securely each
time you check the oil level.
NOTE: For extreme cold operating condi-
tions of 0°F and below, use a partial
synthetic 0W30 motor oil for easier starting.
NOTE: S.A.E. 5W30 motor oil may be used
to make starting easier in areas where tem-
perature is consistently 20°F or lower.