


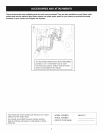
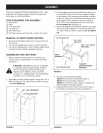
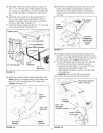
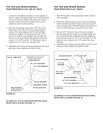


25.Assemblea shorttarpstrapto reardoorusingone
1/4"x 1-1/4"hexbolt,two1/4"flatwashersandone
1/4"nylocknut.Assemblean"S"hookthroughloose
endofstrap.Seefigure15.Repeatonothersideof
door.
26.Assembledoorto rearof cartbyrestingbottomof
doorondoorsupportsandpushingtopof doorin
againstcrossbrace.Securetopofdoorusingdoor
latchesoneachside.Seefigure15.
27.Hookboththetarpstrapsontothe 1/4"x 1"hexbolts
inthesidesofthecart.Seefigure15.
DOOR LATCH
1/4" FLAT
WASHER
1/4" x 1-1/4" HEX BOLT
1/4" FLAT WASHER
STRAP (SHORT)
1/4" NYLOCK NUT
FIGURE 15
DOOR
SUPPORTS
1/4" x 1"
HEX BOLT
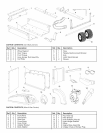
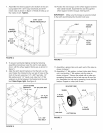
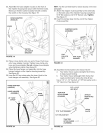
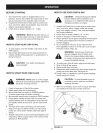
28. Attach the engine/impeller housing assembly to the
upper holes in the angles welded to the tongue. Use
four 5/16" x 3/4" hex bolts and 5/16" nylock nuts.
Tighten. See figure 16.
5/16"
NYLOCK
NUT
5/16" x 3/4"
HEX BOLT
WELDED
ANGLES
FRONT_
_ONGUE
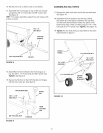
29. Remove the hex bolts and nylock nuts from the two
holes in the impeller housing shown in figure 17.
Assemble the hose hanger bracket to the impeller
housing using the bolts and nylock nuts which you
removed.
USE THESE
HOLES
HOSE
HANGER
)
BRACKET
USE PRE-
BOLTS AND
NYLOCK
NUTS
FIGURE 17
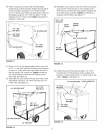
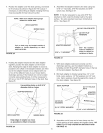
30. Assemble the elbow to the impeller housing using
four 5/16" x 3/4" self tapping hex bolts and four nylon
washers. Push while turning to help start the bolts into
the unthreaded holes. Tighten. See figure 18.
31. To center the elbow with the opening in the hard top:
a. Push the vinyl boot back inside the opening.
b. Loosen by approximately 1/4 turn each, the four
bolts that you assembled in figure 16.
c. Push against the elbow to center it with the sides
of the opening.
d. Retighten the four bolts that you loosened.
32. Pull the vinyl boot onto the end of the elbow.
Center elbow between
aides of opening
\
NYLON
WASHER
HEX BOLT I '_-_.'-
(Thread Forming) G_ ....
Looae_n4_(_a
I 114turn each %,, ,
FIGURE 16 FIGURE 18
12