


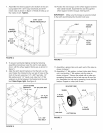
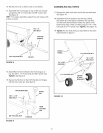


13. Flip the cart over so that it rests on its wheels.
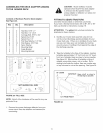
14. Assemble the front tongue on top of the rear tongue
using three 3/8" x 3" hex bolts and 3/8" nylock nuts.
See figure 8.
HINT: For easier assembly, support the rear tongue with
a block of wood.
3/8" x 3"
_ HEX BOLT%
_ _ o TONGUE
(FRONT)
/÷ \
3/8" NYLOCK NUT BLOCK
FIGURE 8
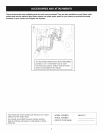
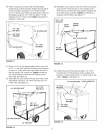
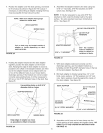
15. Assemble the hitch bracket to the front tongue us-
ing two 3/8" x 1-1/4" hex bolts and 3/8" nylock nuts.
Tighten. See figure 9.
18. Secure the hitch pin to the hitch bracket and tongue
with the hair cotter pin. See figure 9.
HITCH BRACKET
\
i
r
/®
3/8" NYLOCK NUT
TONGUE
HITCH
PIN
/
HAIR
COTTER
PIN
/
FIGURE 9
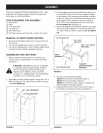
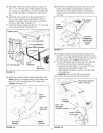
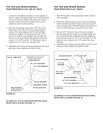
ASSEMBLING VAC PARTS
17. Release the latch lock lever and tilt the cart bed back.
See figure 10.
18. Assemble the front panel to the cart bed, sliding
the bottom lip of the panel in between the cart bed
and the latch stand bracket. Fasten the panel to the
bottom and sides of the cart bed using six 1/4" x 5/8"
hex bolts and 1/4" nylock nuts. Tighten. See figure 10.
19. Tighten the two bolts that you assembled to the latch
stand bracket in figure 5.
FRONT
PANEL
114" x 5/8"
HEX BOLT
\
\
\
\
\
\
\
\
\
\
\
\
\
\
\
\
114"NYLOCK NUT
\\
\
114" x 5/8"
HEX BOLT
/
/
/
1/4"NYLOCK NUT
/ LATCH
STAND
FIGURE 10
lO