


This unit is shipped WITHOUT GASOLINE or OIL. After
assembly, see separate engine manual for proper fuel
and engine oil recommendations.
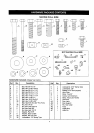
TOOLS REQUIRED FOR ASSEMBLY
(1) Screwdriver
(1) Pliers
(2) 7/16"Wrenches
(2) 1/2" Wrench
(2) 9/16" Wrenches
(2) 3/4" Wrenches (only if figure 24 on page 14 is used)
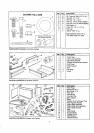
REMOVAL OF PARTS FROM CARTON
• Remove the hardwarepack and all loose pars from
the carton. Be sure the carton is empty before
discarding.
• Lay out atlthe pars as shown in the carton contents,
Keep contents of hardware packages separated.
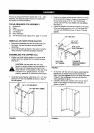
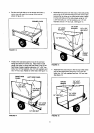
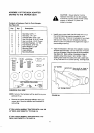
ASSEMBLING THE CHIPPER VAC
• Position cart body halves upright on a smooth level
surface such as a garage floor or a paved driveway.
See figure 1.
&
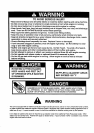
CAUTION: Do not leave the cart unat-
tended in upright position during assembly. A
falling cart can cause personal injury! Pay
close attention to the stability of the cart while
it remains in an upright position. For best
stability, assemble on a smooth level surface.
• Assemble halves together using three 1/4" x 1/2" hex
bolts and 1/4" hex nuts (SEMS) as shown in figure 1.
Do not tighten.
1/4" x 1/2" HEX BOLT
1/4" HEX NUT (SEMS)
FIGURE 1
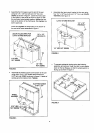
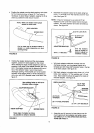
• Position the tailgate reinforcement bracket on outside
of cart as shown in figure 2. Fasten to the bottom of
the cart body using six 5/16" x 3/4" slotted head
screws and 5/16" hex nuts (SEMS). Do not tighten.
See figure 2.
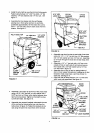
• Fasten the tailgate reinforcement bracket to the sides
of the cart body using four 1/4" x 1/2" hex bolts and
1/4" hex nuts (SEMS) as shown in figure 2. Do not
tighten.
1/4" HEX NUT
1/4" x 1/2"
. HEX BOLT
*_'" "'_'_/ 5116"x 3/4"
._-,_" SLO'I-FED BOLT
5/16" HEX TAILGATE
NUT (SEMS) REINFORCEMENT
BRACKET
FIGURE 2
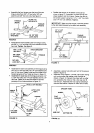
• At this time, withthe cartbody halves pulled together,
tighten the sixslottedhead screws assembled in
figure 2 and then tighten the four hex bolts assembled
infigure 2. Do not tighten the three hex bolts that
were assembled infigure 1.
• Carefully reverse the position of the cart so that it
rests on the tailgate reinforcement bracket, as
shown in figure 3.
o
o • d
)
FIGURE 3