


8
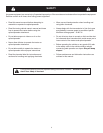
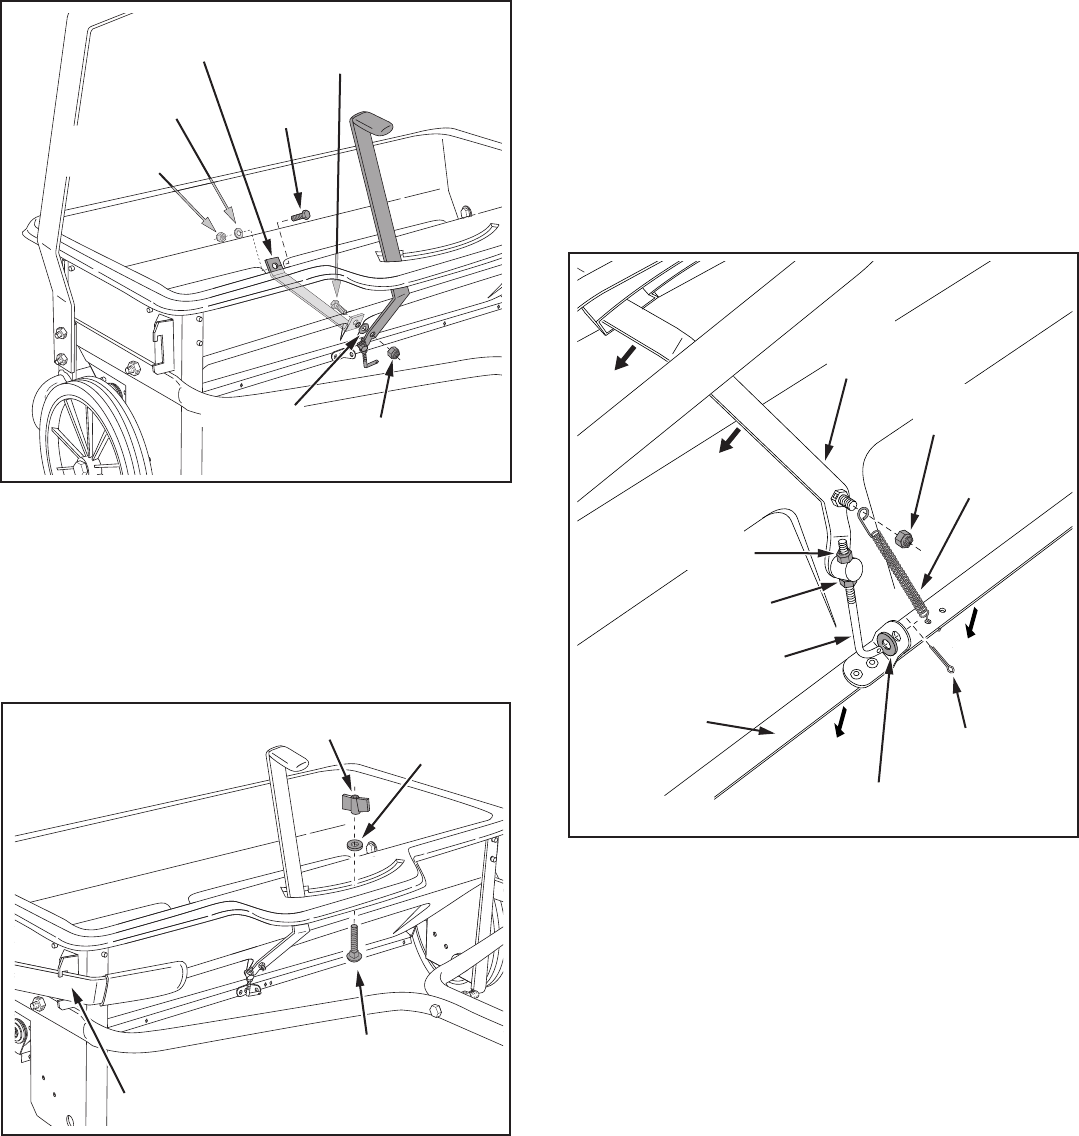
FIGURE 9
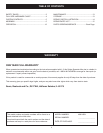
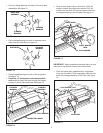
FIGURE 8
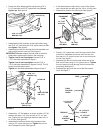
• Insert the 5/16" x 1-3/4" carriage bolt up through the
slot and secure it with a nylon washer and the plastic
wing nut. See gure 9.
• Move the lift handle into the locked position as shown
in gure 9 and then tip the spreader back to rest on
the wheels and the rear of the hopper.
1/4" x 3/4"
HEX BOLT
1/4" FLAT
WASHER
CENTER
BRACE
1/4" x 1-1/4"
HEX BOLT
1/4" FLAT
WASHER
1/4" HEX
LOCK NUT
1/4" NYLOCK
HEX NUT
PLASTIC WING NUT
NYLON
WASHER
5/16" x 1-3/4"
CARRIAGE BOLT
LOCKED POSITION
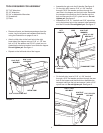
• Place the ow control lever into the slot in the hopper.
See gure 8.
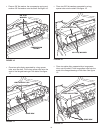
• Place the center brace into the hopper. Insert the 1/4"
x 1-1/4" hex bolt through the center brace and the
front of the hopper. Assemble a 1/4" at washer, the
ow control lever and a 1/4" nylock hex nut onto the
bolt. Do not tighten yet. See gure 8.
• Insert the 1/4" x 3/4" hex bolt through the center
brace and the rear of the hopper. Assemble a 1/4" at
washer and 1/4" nylock hex nut onto the bolt. Tighten
both the front and rear bolts. See gure 8.
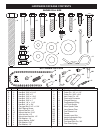
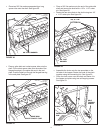
FIGURE 10
EXTENSION
SPRING
NYLON
WASHER
3/32" x 3/4"
COTTER PIN
FLOW
CONTROL
LEVER
FLOW CONTROL LINK
FEED PLATE
1/4" NYLOCK
HEX NUT
1/4" NYLOCK
HEX NUT
1/4" NYLOCK
HEX NUT
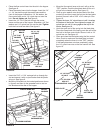
• Move the ow control lever as far as it will go to the
"OFF" position. Push the feed plate back as far as it
will go to the closed position. See gure 10.
• Place a nylon washer onto the bent end of the ow
control link and then insert the link into the feed plate
bracket. Secure it with a 3/32" x 3/4" cotter pin. See
gure 10.
• Tighten the lower 1/4" nylock hex nut until it touches
the bottom of the ferrule, then tighten the upper 1/4"
nylock hex nut until it is snug against the top of the
ferrule. See gure 10.
• Hook the open end of the spring into the feed plate.
Place the closed end of the spring onto the end of the
hex bolt in the ow control lever. Secure it with a 1/4"
nylock hex nut. See gure 10.
• Open and close the feed plate using the ow control
lever. Check to make sure the feed plate is closed
completely when the lever is in the "OFF" position.
If the feed plate does not close completely, adjust
the 1/4" nylock hex nuts on the ow control link. See
gure 10.