7
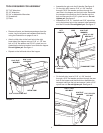
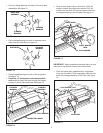
FIGURE 4
• Fasten the hitch tubes together using three 5/16" x
2-1/4" hex bolts and 5/16" nylock hex nuts. Do not
tighten yet. See gure 4.
FIGURE 5
5/16" x 2-1/4"
HEX BOLT (3)
5/16" NYLOCK
HEX NUT (3)
5/16" x 2"
HEX BOLT (2)
HITCH PIN
HAIR COTTER
PIN (1/8")
5/16" NYLOCK
HEX NUT (2)
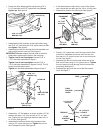
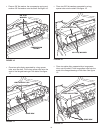
• Assemble a 1/2" at washer, a wheel, another 1/2" at
washer and then a 1/2" jam nut onto a 1/2" x 4" hex
bolt. Tighten the nut nger tight and then back off 1/4
to 1/2 turn. See gure 6.
• Assemble the bolt and wheel to the transport tube
using a 1/2" nylock hex jam nut. Tighten the nut but
don't collapse the tube. See gure 6.
FIGURE 7
FIGURE 6
1/2" HEX
JAM NUT
TRANSPORT
TUBE
1/2" x 4"
HEX BOLT
1/2" NYLOCK
HEX JAM NUT
1/2" FLAT
WASHER
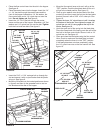
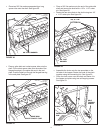
• Screw a 1/4" nylock hex nut all the way onto the ow
control link. Assemble the ferrule onto the link and
then start a 1/4" nylock hex nut one or two turns onto
the link. See gure 7.
• Assemble the ferrule into the hole at the end of the
ow control lever using a 1/4" nylock hex nut. Tighten
the nut, leaving it loose enough that the ferrule can
pivot freely. See gure 7.
• Assemble the grip onto the end of the ow control
lever. See gure 7.
FLOW
CONTROL
LINK
FERRULE
GRIP
FLOW
CONTROL
LEVER
1/4" NYLOCK
HEX NUT
1/4" NYLOCK
HEX NUT
1/4" NYLOCK
HEX NUT
• Assemble the hitch brackets to the hitch tubes using
two 5/16" x 2" hex bolts and 5/16" nylock hex nuts. Do
not tighten. See gure 5.
• Assemble the hitch pin through the hitch brackets and
secure with the hair cotter pin. See gure 5.
IMPORTANT: Do not collapse the at ends of the hitch
tubes when tightening the bolts in the next step.
• Tighten, but do not overtighten the two 5/16" x
1-1/2" hex bolts assembled in gure 1.
Tighten, but do not overtighten the two 5/16" x
1-3/4" hex bolts assembled in gures 2 and 3. The lift
handle must be able to pivot.
Tighten the hex bolts assembled in gure 4 and 5.
• If the wheel does not spin freely, back off the nylock
jam nut and then the plain jam nut 1/4 to 1/2 turn each.
• Assemble a wheel to the other side. See gure 6.


