


[_1 WARNING: Before you begin using any
attachment, read and understand the manual that
came with the attachment. Follow all safety
information contained within.
!_l WARN'NG: To avoid serious personal injury and
damage to the unit, shut the unit off before
removing or installing add-ons.
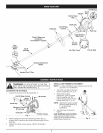
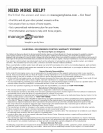
USING THE CRAFTSMAN CONVERTIBLE TM FEATURE
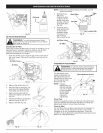
You can convert this unit to edge g0°Edging Hole
grass. (Trimmer Onh
1. Make sure the unit is turned
completely off.
2. Turn the knob counterclockwise
to loosen coupler (Fig. 16).
3. Push in the release button (Fig.
17) and twist the shaft 90° until
the release button snaps into the Knob
90 ° hole (Fig. 16).
4. Turn the knob clockwise to lock
the coupler (Fig. 18). Fig. 16
Craftsman Convertible TM
Coupler Primary Hole Release Button
Fig. 17
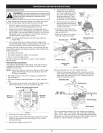
Guide Recess
Upper
Boom
Attachment
Knob
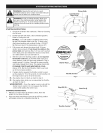
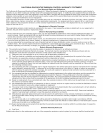
CRAFTSMAN CONVERTIBLE TM FEATURE
CAUTION: These add-on attachments are to be I
snapped into the primary hole only. Using the wrong
hoe cou dead to persona nury or damage to the unt.j
The coupler allows you to convert this unit for use with the
following add-on attachments:
• Cultivator
Blade Edger
Blower
Brush Cutter
Pruner
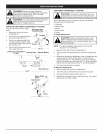
To Install Attachments
CAUTION: Before operating this unit, be sure
that the release button is fully snapped into the
J
primary hole (Fig. 16), and that the knob (Fig. 17) is
securely tightened.
NOTE: To make installation easier, place the unit on the
ground or on a workbench.
1. Make sure the unit is turned completely off.
2. Turn the knob counterclockwise to loosen the coupler (Fig.
16).
3. While firmly holding the attachment, push it straight into the
coupler until the release button (Fig. 17) snaps into the
primary hole (Fig. 17). The primary hole is on the opposite
side of the coupler from the knob (Fig. 17). Align the release
button with the Guide Recess (Fig. 17) to help installation.
4. Turn the knob clockwise to tighten.
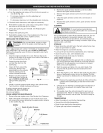
To Remove Attachments
1. Make sure the unit is turned completely off
2. Turn the knob counterclockwise to loosen the coupler.
3. Press and hold the release button (Fig. 17).
4. While firmly holding the upper shaft boom (Fig. 18), pull the
attachment out of the coupler.
Fig. 18