


Whil s at
its be
C
C
a
a
e your telescope requires little maintenance, there are a few things to remember that will ensure your telescope perform
st. Each optical design type has special collimation instructions described below.
r
r
e
e
a
a
n
n
d
d
C
C
l
l
e
e
a
a
n
n
i
i
n
n
g
g
o
o
f
f
t
t
h
h
e
e
O
O
p
p
t
t
i
i
c
c
s
s
Occa n the objective lens, the corrector plate, or primary mirror depending on which
type e taken when cleaning any instrument so as not to damage the optics.
If du to
the g ove
any r d
go fr
You ith
distill and 40% distilled water. Or, liquid dish soap diluted with water (a
couple of drops per one quart of water) can be used.
Occa experience dew build-up on the optics of your telescope during an observing session. If you want to
conti emoved, either with a hair dryer (on low setting) or by pointing the telescope at the ground
until e dew has evaporated.
If m ree
envir
To minimize the need to clean your telescope, replace all lens covers once you have finished using it. Since the cells are NOT
seale e covers should be placed over the openings when not in use. This will prevent contaminants from entering the optical
tube.
Inter e done only by the Celestron repair department. If your telescope is in need of internal
clean authorization number and price quote.
C
C
o
o
sionally, dust and/or moisture may build up o
of telescope you have. Special care should b
st has built up on the optics, remove it with a brush (made of camel’s hair) or a can of pressurized air. Spray at an angle
lass surface for approximately two to four seconds. Then, use an optical cleaning solution and white tissue paper to rem
emaining debris. Apply the solution to the tissue and then apply the tissue paper to the optics. Low pressure strokes shoul
om the center of the lens to the outer portion. Do NOT rub in circles!
can use a commercially made lens cleaner or mix your own. A good cleaning solution is isopropyl alcohol mixed w
ed water. The solution should be 60% isopropyl alcohol
sionally, you may
nue observing, the dew must be r
th
oisture condenses on the inside of the optics, remove the accessories from the telescope. Place the telescope in a dust-f
onment and point it down. This will remove the moisture from the telescope tube.
d, th
nal adjustments and cleaning should b
ng, please call the factory for a return
i
39
l
l
l
l
i
i
m
m
a
a
t
t
i
i
o
o
n
n
o
o
f
f
R
R
e
e
f
f
r
r
a
a
c
c
t
t
o
o
r
r
s
s
Be
colli
optic ent with each other and
with the mechanical axis of the telescope tube. For a
refra
axis
eyepi ce on the other end of the tube. Your Omni refractor
was properly aligned at the factory, however rough
handling while traveling may eventually alter the alignment
of the lens. Your Celestron refractor telescope comes with
a fully adjustable objective lens housing to ensure proper
alignment of the optical axis.
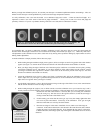
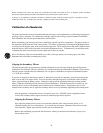
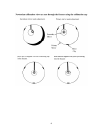
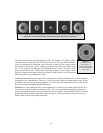
To determine whether or not re-collimation is necessary,
the telescope should be set up outside at night. It should be
a still night and one in which you have let the telescope sit
outside for 15 to 30 minutes before attempting collimation.
You should also wait for a night with good seeing
conditions and avoid looking over anything that produces
heat waves (i.e., roof tops, car hoods, etc.).
sure to completely read carefully before attempting
mation. Collimation is the process of aligning the
al axis of each optical elem
ctor telescope design this means aligning the optical
of the objective lens with the optical axis of the
e
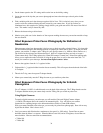
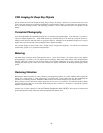
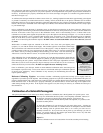
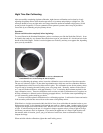
Mounting Screws
(Phillips head)
Collimation Screws
(Allen head)
Figure 7-1 – Objective lens housing (with lens shade
removed) show mounting and collimation screws.