


29
8. ipping in R.A. The telescope will track in R.A. as
9.
d the object should be there. For some of the fainter objects, you may not be
W
you can “star hop” through the fi
This process can be repeated for any given night.
U
U
s
s
i
i
n
n
g
g
t
t
h
h
e
e
R
R
.
.
A
A
.
.
V
V
e
e
r
r
n
ni
Lock the R.A. clamp to prevent the telescope from sl
ng as the motor drive is operating.
lo
Look through the finderscope to see if you have located the object and center the object in the finder.
10. Look in the main optics an
able to see them in the finder.
hen this happens, it is a good idea to have a star chart of the area so that
eld to your target.
each object throughout
ie
e
r
r
S
S
c
c
a
a
l
l
e
e
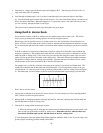
To increase the accuracy of the R.A. setting circle, the mount comes with a vernier scale. This device
allows you to get more precise re ings down to one minute of right ascension.
n e the vernier, let’s take a look at the scale and learn how to
n the vernier is the R.A. indicator and will hereafter be referred to as such.
g circle, then that is the coordinate the
rises when the R.A. indicator (zero mark) is in between two of the
you will notice that along the vernier scale, one of the
of minutes
.A. marks,
ator (zero mark on the vernier) is just left of the 5
h
40
m
mark. This
would place it between the 5
h
40
m
mark and the 5
h
50
m
mark. If you look down the vernier scale, you
44
m
.
.A. indicator is between the 18
h
50
m
mark and
andle until the three on the vernier scale
, the R.A. indicator must stay
0
m
mark on the R.A. setting circle!
f view if you are using a low
power eyepiece (assuming you have already set the DEC).
ad
Before we go into the specifics o
ad it. First, the zero (0) mark o
how to us
re
It is on the extreme right end of the vernier scale with the other numbers increasing as you move toward the
left.
the R.A. indicator is right on one of the marks of the R.A. settin
If
telescope is pointing at. The problem a
marks on the R.A. setting circle. If this is the case
marks will line up with one of the marks on the setting circle. This mark indicates the number
that should be added to the R.A. reading of the indicator. Since the indicator is between two R
add the minutes to the lower value that the R.A. indicator falls between.
For example, let’s say the R.A. indic
will see that the “4” is the only mark to line up with any of the marks on the R.A. setting circle (see figure
8). This means that you are 4 minutes to the left of the 5
h
and 40
m
mark or more simply at 5
h
and
Figure 4-7 Vernier Scale
ere’s how to use the vernier:
H
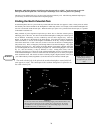
1. Look up the coordinates of the object you want to observe. For our example we will use the Ring Nebula
(M57) which is at 18
h
53
m
right ascension.
. Release the R.A. clamp and rotate the telescope until the R
2
the 19
h
00
m
mark on the R.A. setting circle.
3. Lock the R.A. clamp to hold the telescope in place.
4. Move the telescope in R.A. using the slow motion control h
lines up with one of the marks on the R.A. setting circle. Remember
between the 18
h
50
m
mark and the 19
h
0
5. Look through the telescope and the Ring Nebula should be within the field o