


16
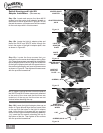
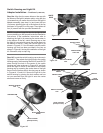
Figure #1
Adaptor Installation: -
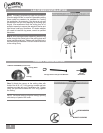
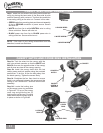
Step 12a. Locate and remove the three #8-32
screws from the center shaft adapter located on
the bottom of the fan as shown in Figure #1. Do not
discard the screws, all three screws will be needed
for the next steps with in this document.
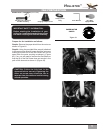
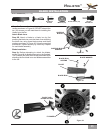
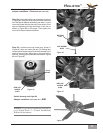
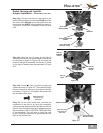
Step 12b. Locate the light kit adaptor plate and
thread the BLUE and WHITE wires through the
hole in the center of the light kit adaptor plate, also
as shown in Figure #2.
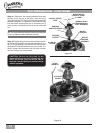
Step 12c. Locate the three screws that you
removed from the center shaft adapter during Step
12a. These three screws are needed to attached the
light kit adaptor plate to the fan. Align the screw hole
on the light kit adaptor plate with the screw holes on
the center shaft adaptor and insert all three screws
as shown in Figure #3. Then tighten all three screws
with the provided screwdriver.
NOTE: Make sure that the wire nuts on the ends of
the WHITE and BLUE wires are securely attached
to the ends of the wires and that the wires are
tucked out of the way so that the wires are not
pinched when attaching the cap.
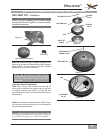
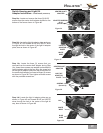
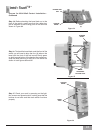
Step 12d. Locate the light kit adaptor plate cap as
shown in Figure #4 and align the four screw holes
on the cap with the holes on the light kit adaptor
plate. Using the four (4) screws that you removed
earlier from the light kit adaptor assembly (see step
11c), insert the four screws, attaching the cap to
the bottom of the fan. Then tighten all four screws
with the provided screwdriver.
CENTER SHAFT
ADAPTER
ADAPTER SCREWS
, #8-32
Figure #2
Figure #3
WHITE
WIRE
BLUE
WIRE
ADAPTOR
PLATE
CENTER SHAFT
ADAPTER
ADAPTOR
PLATE
SCREWS , #8-32
WIRE NUTS
(WHITE and BLUE)
WIRES
CAP
SCREWS, #6-32
ADAPTOR
PLATE
Figure #4