


Savannah Octagon Gazebo Assembly
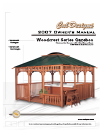
2007 Woodcrest Series Gazebo Owner’s Manual Page 5
LTR20071040, Rev. A
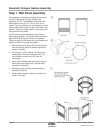
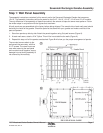
Step 2: Composition Roof Assembly
Check the parts list that came with your gazebo
and make sure that all the parts are present. Also,
please follow the written steps in conjunction with
the fi gures that are shown.
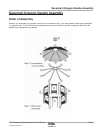
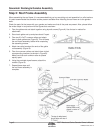
Lay the 8-sided main roof support section fl at
on the ground. Referring the Figure A, attach
the roof support boards to the 8-sided main
roof support.
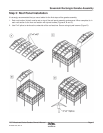
With the assistance of another person, place
the roof frame assembly onto the assembled
wall panels. There is a notch at each corner
of the wall panel assembly (8 total). Place the
roof frame in these notches and secure with
drywall screws (Figure A).
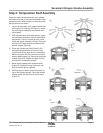
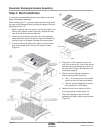
Place the 4-sided roof tiles (8 total) in the
corresponding positions on the roof frame
(narrow end on top, wide end on the bottom).
Make sure each roof tile is centered on each
support before securing. Secure using drywall
screws (Figure B). Repeat this step until the
roof frame is completely covered.
Attach each ridgecap with drywall screws
(Figure B). Repeat this step until each roof
joint is covered with a ridgecap.
With the aid of a ladder, place the copula on
top of the fi nished gazebo. Using the drywall
screws, attach the copula to the roof frame
(Figure C).
1.
2.
3.
4.
5.