


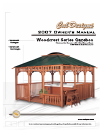

Page 2 2007 Woodcrest Series Gazebo Owner’s Manual
LTR20071040, Rev. A
Delivery and Set-up
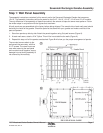
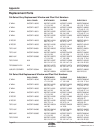
Size Specifi cations
Model Length Width
Ponderosa Gazebo 8’ 8’
Savannah Wall Gazebo 12’ 8’
10’ 10’
12’ 10’
16’ 10’
12’ 12’
16’ 12’
10’ (Octagon) 10’
12’ (Octagon) 12’
15’ (Octagon) 15
18’ (Octagon) 18’
For all gazebos, regardless of model, it is
recommended that the foundation extend beyond the
dimension of the gazebo. For example, if the gazebo
you purchased is 12’x12’, you will want your foundation
to be 14’x14’. The reason for this is because it will be
easier to maintain the area around the gazebo (mowing
the lawn, edging, etc.) without damaging or scarring
the gazebo. Also, in doing this, you will eliminate any
potential problems, foundation-wise, in the future.
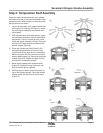
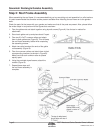
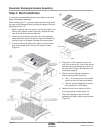
Assembly Basics
The following will tell you how to assembly your
gazebo. If you have any questions, problems with
material and/or parts, please contact your local retailer.
NOTE: It is strongly advised that you have a licensed
professional install the foundation for your new gazebo.
It is imperative that the foundation is level, as any
damage that occurs due to an uneven foundation is not
covered by the warranty.
When assembling the gazebo, the owner must
determine what is the gazebo going to cover. If you
plan to use it as a cover for patio furniture, then you
can place the gazebo wherever you want it.
If the gazebo is going to cover a spa, we recommend
that the spa be located in the center of the slab (for
weight distribution) with the gazebo main supports
mounted to the concrete at each of the four corners.
Prior to delivery of your new Cal Spa, we
recommend that you determine where your spa will
be placed. For example: if you are going to center
your spa on the concrete slab, take measurements
that will enable you to determine where the edges
of the spa will be located. When done, mark the
corner locations.)
1.
Upon delivery of your new Cal Spa, notify the
installation crew that you have determined where
you want the spa located.
After the spa has been installed and is operating,
the assembly of the your new gazebo may begin.
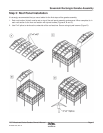
Important: This gazebo is a free-standing unit. As with
any structure, it is critical that all the main support posts
be plumb (vertically level). If the fi rst main support post
is not plumb, then the entire gazebo will be misaligned.
The best way to keep the structure level is to use a
level after each time an item is attached or tightened.
This will ensure that after each major step is taken, the
gazebo remains level.
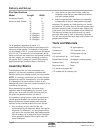
Tools and Materials
Utility knife 25’ tape measure
Cordless drill 100’ extension cord
Electric drill Phillips-head drill tips
1/8” pilot hole drill bit 9/16” socket
Slotted-head drill tips Sandpaper (various grades)
Redwood stain Wood putty
Gray wash stain Rags
1/2” ratchet and impact drill
1/2” carbide drill bit (masonry bit)
2.
3.