


DETAILED ASSEMBLY
No tools are required for assembly of your telescope.
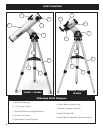
Remove all components from the carton and identify all components. It is a good idea to lay all the parts out in front of you before
assembly. Since your telescope is a precision optical system the parts require careful handling—particularly the onboard computer,
telescope, eyepieces, and various accessory lenses.
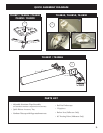
SET UP TRIPOD AND ACCESSORY TRAY
1. Stand Northstar Computerized Star Locator Assembly and attached tripod legs in the upright position.
S
pread tripod legs to a comfortable distance.
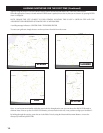
2. Fold down the accessory tray braces and place the Quick Release Accessory Tray on top of braces.
(
See Quick Assembly Diagram)
3. Turn accessory tray until it snaps into place.
4. Adjust tripod leg height to suit by opening tripod leg lever and extending tripod legs to desired height.
C
lamp Tripod Leg lever closed when complete.
ATTACH TELESCOPE TUBE
1. Locate Main Telescope Tube.
2. Remove Telescope Tube Thumb Nuts from side of Telescope Tube (78-8831 and 78-8846 only). For 78-8890, back out silver lug
screw on Telescope Mount top.
3. Position Main Telescope Tube Attachment Bolts through Telescope Tube Bracket at the top of the Northstar Computerized
Star Locator Assembly (78-8831 and 78-8846 only). For 78-8890, slide black telescope tube bracket into telescope mount
receiver. Make sure telescope is pointing in the correction direction. (Logo on telescope tube should be right-side up.)
4. Reattach Telescope Tube Thumb Nuts to Main Telescope Tube Attachment Bolts once Main Telescope Tube and Northstar
C
omputerized Star Locator Assembly are assembled together (78-8831 and 78-8846 only). For 78-8890, tighten silver lug screw
on Telescope Mount top into desired depression on the black telescope tube bracket.
ATTACH FINAL TELESCOPE ACCESSORIES
1. Locate Red Dot Finderscope.
F
or Reflector Telescopes: Remove Finderscope attachment nuts from Main Telescope Tube. Place Finderscope
Assembly over Finderscope Attachment Bolts and reattach Finderscope thumb nuts to Finderscope Mount Bolts.
N
OTE: The large end of the finderscope should face the open end of telescope tube.
2. Attach Low Power Eyepiece.
F
or Reflector Telescope Models: Insert lowest power eyepiece in the focusing mechanism by backing out
eyepiece set screw and inserting eyepiece fully.
3. Tighten all set screws to secure accessories.
6.
SELECTING AN EYEPIECE
You should always start viewing with the lowest power eyepiece, which in this case is the 20 mm lens. Note: the base power of each
eyepiece is determined by the focal length of the telescope objective lens. A formula can be used to determine the power of each
eyepiece: telescope OBJECTIVE lens focal length divided by EYEPIECE focal length = MAGNIFICATION (e.g. Using the 20 mm
lens, a sample calculation could look like this: 750 mm / 20 = 38x or 38 power. Telescope models will vary in focal length.)
(Reflectors Only)
Included with this telescope is a Barlow lens. Barlow lenses are used to double or triple the power of your telescope. Place your
Barlow between the focusing tube and the eyepiece. Using the example above, your 3x Barlow lens would give you a total power of
114x or 114 power. (38 x 3 = 114x or 114 power). The magnification calculation would look like this: 750 mm /20mm = 38 power.
38 power x 3=114 power.