


14
15
B. PHOTO SUITE 5 INSTALLATION
From the opening CD-ROM screen, select “Photo Suite 5.0”, then follow the on-screen directions, beginning with selecting your
preferred language for the installation dialogue boxes that follow. Be sure to read the Release Notes completely, noting any tips or
potential issues relevant to your operating system. For PhotoSuite technical support, go to www.roxio.com and click “Support”, then
search the “Knowledgebase”, entering “photosuite” as the keyword.
If you plan to use other photo editing software, it is not necessary to install PhotoSuite. You may use method A below to transfer
photos from the Imageview to your internal hard drive, then open them as .jpg files with the software of your choice.
DOWNLOADING PHOTOS
Either of two methods may be used:
A. TRANSFER ALL PHOTOS TO YOUR INTERNAL HARD DRIVE (RECOMMENDED)
Connect the camera to your computer as directed in “Connection to the computer” (be sure the driver was installed first if you
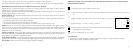
use Windows 98). Open Windows Explorer or “My Computer”. The Imageview will be shown as a new “Removable Disk” with
an assigned letter such as “E”. Double click this new disk icon and then open the “DCIM” folder inside, then any subfolder inside
that. You will now see your photos-they are named “Dsc_” followed by a number indicating the order they were taken. Clicking
any single photo once should show a small preview. Use “Edit>Select All” or click a single photo and copy, then paste or simply
drag them to the folder of your choice (for example, “My Pictures”) on your local hard drive. Once transferred, the photos may be
opened, viewed, edited and resaved using the included PhotoSuite software or any compatible photo editing program. Or you can
just email a photo or insert it as a .jpg file in any document “as is”. After transferring, you are free to disconnect the camera and
delete the photos you downloaded to your PC (you may want to open one or more from your internal hard drive to confirm they
were transferred successfully).
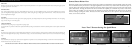
B. OPENING PHOTO FILES DIRECTLY IN PHOTOSUITE FROM THE CONNECTED CAMERA (OPTIONAL)
With the Imageview plugged in to your computer’s USB port, start PhotoSuite. From the File menu, select “Open Photo”. Using the
“Look in” pull down menu at the top of the Open window, select “My Computer”. Then select the “Removable Disk” which represents
the connected Imageview. Double click, or select “Open”. Then open the folders found in the “Removable Disk” until you see a series of
thumbnail photos with the file names (e.g., Dsc_001) below. Select one of the photos and double click or select “Open”. The photo will
open in the editing screen of PhotoSuite. Edit the photo if desired (use the Help menu in PhotoSuite if necessary), then click “Done”.
To save a copy of the edited photo to your hard drive, rather than back to the Imageview’s memory, answer “Save Changes?” with “Yes”,
but then answer “Replace Existing File?” with “No”, and use the Save As dialog box (“Save In” pulldown as you did earlier to “Look In”)
to navigate to a folder on your “C” drive or other desired storage location.
NOTES: