3-2 Receiving & Installation MN2417
Several other factors should be carefully evaluated when selecting a location for installation:
1. For effective cooling and maintenance, the system should be mounted on a flat,
smooth, noncombustible level surface. A concrete pad is ideal and provides a secure
installation.
2. Installation should prevent water levels from reaching the generator. Drainage must be
adequate to keep concrete pad free from standing water.
3. Installation should prevent obstructions by buildup of leaves, grass, sand, snow, etc. If
these items pose a problem, consider building a small fence or other break to protect
the unit from accumulation of debris.
4. Installation should place the generator as close as possible to the transfer switch.
5. At least forty --eight (48) inches clearance must be provided on all s ides for air flow.
6. Access must be provided to allow the enclosure covers to be opened or removed for
service and maintenance.
7. Maximum Ambient temperature is 122°F(50°C).
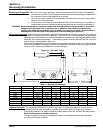
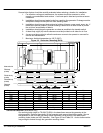
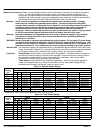
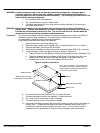
Figure 3-2 Generator Mounting (Skid)
B1
B
A
A2 A1
TS130/175 only
(4 Holes)
A2A1
TS25/45/80 only
(3 Holes)
A1A2 A2
TS250 only
(4 Holes)
A2 A1
A2A1
TA0000C10
BA0236A00
BA0236A02
TS400 only
(6 Holes)
A148
Holes eac h side
212427
10.85401--G10
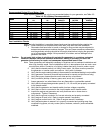
Table 3-2 Mounting Dimensions
Generator A A1 A2 B B1
TS25 74 8.12 23.81 38 36
TS35 74 8.38 28.56 38 36
TS45 84 8.38 28.56 38 36
TS60 84 8.38 28.56 38 36
TS80 84 8.38 28.56 38 36
TS130 118 16.57 26.57 42 40
TS175 130 16.57 26.57 48 46
TS250 159 18.00 40.00 54 52
TS400 195 12.00 SeeFigure3-2 66 63
Secure the Generator (Skid Mount only)
Six mounting bolts (eight for TS130/175/250) in the base frame secure the generator to the
shipping pallet. Remove these bolts, lift the generator and remove the shipping pallet. Secure
the generator to the concrete pad using anchor hardware (not provided) in the base frame
mounting holes (holes are 0.66” diameter). See Figure 3-2 and Table 3-2. Anchor bolts must be
long enough to extend through the generator mounting frame.


