14
REMOVING SNOW
Snow removal conditions vary greatly from light uffy
snowfall to wet heavy snow. Operating instructions must
be exible to t the conditions encountered. The operator
must adapt the ATV and snow thrower to depth of snow,
wind direction, temperature and surface conditions.
Before beginning operation, thoroughly inspect the •
area of operation and remove all door mats, sleds,
boards, wires and other foreign objects.
It is advisable to operate the ATV at a slow ground •
speed for safe and efcient snow removal.
In deep, drifted or banked snow it will be necessary to •
use slow ground speed. Drive forward into the snow
and allow the spiral auger to clear the snow. Repeat
this method until a path is cleared. On the second
pass, overlap the rst enough to allow the snow
thrower to handle the snow without repeated stopping
and starting of forward motion.
In extremely deep snow, raise the snow thrower from •
the ground to remove the top layer and drive forward
only until the ATVs front tires reach the uncleared
bottom layer of snow. Depress the ATV's clutch-brake
pedal and allow the spiral auger to clear the snow.
Reverse the ATV and lower the snow thrower to the
ground. Drive the ATV forward until the snow again
becomes too deep. Repeating this process into and
out of drifts will eventually clear even the deepest of
snow piles.
If the snow thrower becomes clogged with snow or •
jammed with a foreign object, disengage the snow
thrower immediately and shut off the ATV and snow
thrower engines. Set the parking break on the ATV and
unclog the snow thrower with a wooden stick before
resuming operation.
OPERATING TIPS
Discharge snow down wind whenever possible.•
To help prevent snow from sticking to the snow thrower, •
allow the snow thrower to reach outdoor temperature
before using it. A light coat of wax may also be applied
to the inside surface of the snow thrower housing and
discharge chute.
Use tire chains to improve traction if recommended by •
your ATV owners manual.
Before the rst snowfall, remove all stones, sticks and •
other objects which could become hidden by the snow.
Permanent obstacles should be marked for visibility.
Overlap each pass slightly to assure complete snow •
removal.
DANGER: Shut off engine and disengage
snow thrower before unclogging discharge
chute. Unclog using a wooden stick, not
your hands.
RAISING AND LOWERING
To raise, use the handle bar switch to shorten the •
actuator.
To lower, use the handle bar switch to lengthen the •
actuator.
CONTROLLING SNOW DISCHARGE
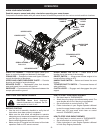
To control the direction snow is thrown, the discharge •
chute has 180 degrees of rotation. Turn the crank rod
clockwise to rotate the chute to the right. Turn the crank
rod counterclockwise to rotate the chute to the left.
To control the distance snow is thrown, the upper •
section of the discharge chute pivots up and down.
Push forward on the chute tilt handle to pivot the chute
down, decreasing the distance snow is thrown. Pull
back on the handle to pivot the chute up, increasing
the distance snow is thrown.
CAUTION: Never operate the ATV snow
thrower without attaching the clip of the
tethered safety switch to your clothing.
A riderless ATV with a running snow
thrower could cause serious injury to a
fallen operator or to others.


