v Make sure that you have all the cables and other equipment that are specified in
the documentation that comes with the drive.
v Select the bay in which you want to install the drive.
v Check the instructions that come with the drive to determine whether you have to
set any switches or jumpers on the drive. If you are installing a SAS or SATA
device, be sure to set the SAS or SATA ID for that device.
v The server supports six 2.5-inch hot-swap SAS or hot-swap SATA hard disk
drives.
v You can mix SAS and SATA hard disk drives in the same server as long as they
are not on the same array.
v The electromagnetic interference (EMI) integrity and cooling of the server are
protected by having all bays and PCI and PCI Express slots covered or
occupied. When you install a drive, PCI, or PCI Express adapter, save the EMC
shield and filler panel from the bay or PCI or PCI Express adapter slot cover in
the event that you later remove the device.
v For a complete list of supported optional devices for the server, see
www.lenovo.com/thinkserver.
To install a 2.5-inch hot-swap SAS or SATA hard disk drive, complete the following
steps:
1. Read the safety information in “Safety” on page vii and “Installation guidelines”
on page 39.
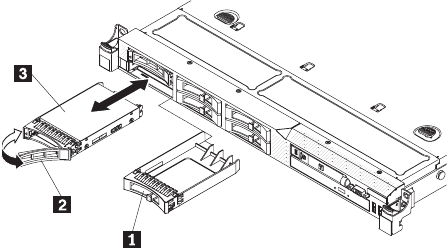
2. Remove the filler panel 1 from the empty drive bay.
3. Touch the static-protective package that contains the drive to any unpainted
metal surface on the server; then, remove the drive from the package and place
it on a static-protective surface.
4. Install the hard disk drive in the drive bay.
a. Make sure that the tray handle 2 is in the open (unlocked) position.
b. Align the drive assembly 3 with the guide rails in the bay.
c. Gently push the drive assembly into the bay until the drive stops.
d. Rotate the tray handle to the closed (locked) position.
e. Check the hard disk drive status LED to verify that the hard disk drive is
operating correctly. If the amber hard disk drive status LED for a drive is lit
continuously, that drive is faulty and must be replaced. If the green hard disk
drive activity LED is flashing, the drive is being accessed.
Note:
If the server is configured for RAID operation using a RAID adapter,
you might have to reconfigure your disk arrays after you install hard disk
drives. See the RAID adapter documentation for additional information about
RAID operation and complete instructions for using the RAID adapter.
52 ThinkServer RD210 Types 3795, 3796, 3818, and 3819: Installation and User Guide


