


5
SECTION 2: SETTING UP YOUR SNOW THROWER
NOTE: The snow thrower is shipped with oil and
WITHOUT GASOLINE. After assembly, refer to
separate engine manual for proper fuel and engine oil
recommendations.
Unpacking
• Cut along corners of the carton and lay it down flat.
Remove packing material.
• Remove any loose parts included with unit (i.e.,
operator’s manual, etc.).
• Roll unit out of carton. Check carton thoroughly for
any remaining loose part.
Loose Parts
Your snow thrower has been assembled at the factory
except the parts shipped loose in the carton. These are
listed below.
a. Electric Start Cord (optional)
b. Shear Pins and Cotter Pins
Before Assembly
Disconnect spark plug wire and ground it against the
engine to prevent unintended starting.
NOTE: All references in this manual to the left or right
side of the snow thrower is from the operating position
only. Exceptions, if any, will be specified.
NOTE: This Operator’s Manual covers several models,
handle panels, lights and chute cranks are some
features that may vary by model. Not all features
referenced in this manual are applicable to all
snowthrower models.
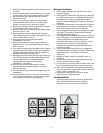
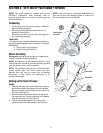
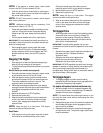
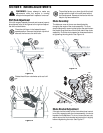
Setting up the Snow Thrower
Handle
1. Observe the lower rear area of the snow thrower to
be sure both cables are aligned with roller guides
before pivoting the handle upward until it clicks into
the place. See Figure 1.
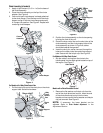
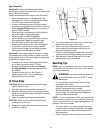
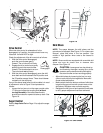
2. Slide the shift rod connector down over the end of
the lower shift rod. Tap the connector until it locks
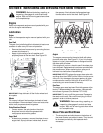
over the lower shift rod. See Figure 2.
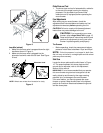
3. Tighten two handle knobs firmly to secure the
upper handle to the lower handles. See Figure 1.
NOTE: If the connector is not properly assembled, the
shift rod will pivot and changing speed or direction of
the snow thrower will not be possible.
Figure 1
Figure 2
R
a
i
s
e
ha
n
dl
e
t
hi
s
w
a
y
1
Panel varies
by model
2
Shift Rod
Connector
Handle Knob
3