


5
SECTION 5: SET-UP INSTRUCTIONS
NOTE: Reference to right or left side of the snow
thrower in this manual is from behind the unit in the
operating position.
IMPORTANT: Check the adjustments as
instructed on page 6, and make any final
adjustments necessary before operating your snow
thrower. Failure to follow the instructions may cause
damage to the snow thrower and void warranty.
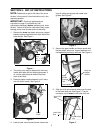
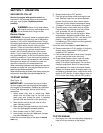
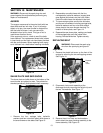
1.Remove the lower two plastic wing nuts, cupped
washers and carriage bolts from each side of the
lower handle. See Figure 1.
Figure 1
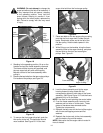
2.The chute crank may be attached to the lower
handle with cable ties for shipping purposes. If
so, cut the cable ties and remove the chute
crank at this time.
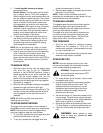
3.Raise the upper handle assembly until it locks
over the lower handle. See Figure 2.
Figure 2
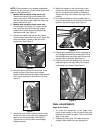
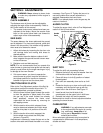
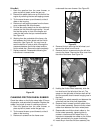
4.Look at lower rear of snow thrower frame to be
sure all cables are aligned with cable roller
guides. See Figure 3.
Figure 3
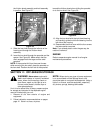
5.Secure the upper handle and lower handle with
the two plastic wing nuts, cupped washers and
carriage bolts previously removed. See Figure 4.
Figure 4
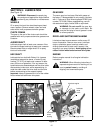
6.Slide the shift rod connector down over the end
of the lower shift rod. See Figure 5. Tap the
connector until it locks on the lower shift rod.
Figure 5
Wing
Nut,
Bolt
Washer
Chute
Crank
up
Move
handle
Check cables
on roller guides
Upper
Handle
Lower Handle
Wing Nut,
Cupped
Carriage
Washer,
Bolt
Insert hairpin
clip
Upper Shift
Rod
Lower Shift
Rod
Connector