


32 Assembly
MAN0765 (12/5/2008)
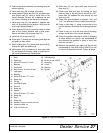
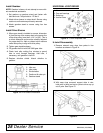
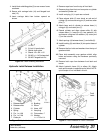
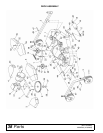
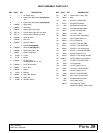
Mulch Kit Installation
NOTE: Do not tighten hardware until mulch kit is com-
pletely installed.
1. Raise deck and lock into transport position.
NOTE: Make sure deck is stable before proceed-
ing.
2. Remove chain shielding if installed. Chain
shielding is not required when using mulch kit.
3. Attach mulch kit frame to bottom of deck using
carriage bolts (4) and flange lock nuts (5). Make
sure head of carriage bolts are on the underside of
the deck.
NOTE: Rotate blades and check for interference
with mulch kit frame. Failure to do so could result
damage or possible injury once mower is operated.
Adjust frame as necessary.
4. Attach the two support brackets (1) to the mulch kit
frame using carriage bolts (2) and flange lock nuts
(3). Make sure head of carriage bolt are on the
blade side of the frame.
5. Using the support brackets as a template mark and
drill two 11/32” holes into the deck baffles.
6. Secure support brackets to baffles using carriage
bolts (2) and flange lock nuts (3). Make sure head
of carriage bolts are on the blade side of the frame.
7. Tighten all hardware.
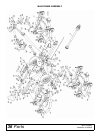
Figure 22. Mulch Kit Installation
A. Mulch kit frame
1. Support bracket
2. 5/16 x 3/4 Carriage bolt
3. 5/16 NC flange lock nut
4. 3/8 NC x 1 Carriage bolt
5. 3/8 NC Flange lock nut