


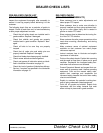


Assembly 31
MAN0765 (12/5/2008)
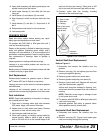
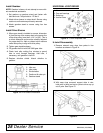
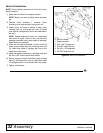
1. Install chain shielding plate (3) to rear mower frame
as shown.
2. Secure with carriage bolts (14) and flanged lock
nuts (15).
3. Insert carriage bolts from bottom upward as
shown.
Figure 19. Chain Shielding Installation
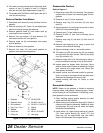
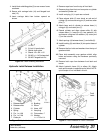
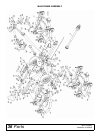
Hydraulic Latch Release Installation
Figure 20. Hydraulic Latch Release Installation
1. Remove rope lever from the top of front latch.
2. Remove plugs from front and rear ports on cylinder
and extend cylinder rod.
3. Install vent plug (11) in port near rod end.
4. Place release slide (2) over clevis on rod end of
cylinder (3) and secure using pin (5) and two cotter
pins (7).
5. Attach base end of cylinder to release base (1)
using pin (6) and cotter pins (7).
6. Extend cylinder and align release slide (2) with
release base (1). Insert pin (6), two washers (13)
and secure using two flat washers (12) cotter pins
(7) on the out side.
7. Attach springs (4) between base (1) and slide (2).
8. Install bushing (8) and elbow (9) into port at base of
cylinder.
9. Remove the four bolts and washers from the top of
gearbox shield.
10. Place latch assembly over gearbox shield, align
holes and secure using the hardware previously
removed.
11. Remove latch rope from between front latch and
tractor.
12. Attach hydraulic hose (10) to elbow (9). Attach
male quick coupler to opposite end of hose. NOTE:
quick coupler is not included in this kit.
Figure 21. Latch Release to Trailer Connection
1. 1/4 Pin
2. 3-Link 1/4 proof chain
3. Shield, chain plate
4. Sleeve 1/2 x 3/4 x 1/2
5. 3/8 NC x 1-1/4 Carriage bolt
6. 3/8 NC Flanged lock nut
1. Release base
2. Release slide
3. Cylinder
4. Spring
5. Pin, 1 x 4.08
6. Pin, 1 x 5.08
7. Cotter pin
8. Bushing
9. Elbow
10. Hose, 108”
11. Vent plug
12. Flat washer, 1”
13. Washer,
1 x 1-7/8 x 1/4
(Rev. 2/6/2009)