


48
CORTADORA DE CÉSPED
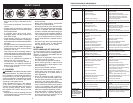
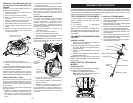
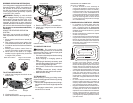
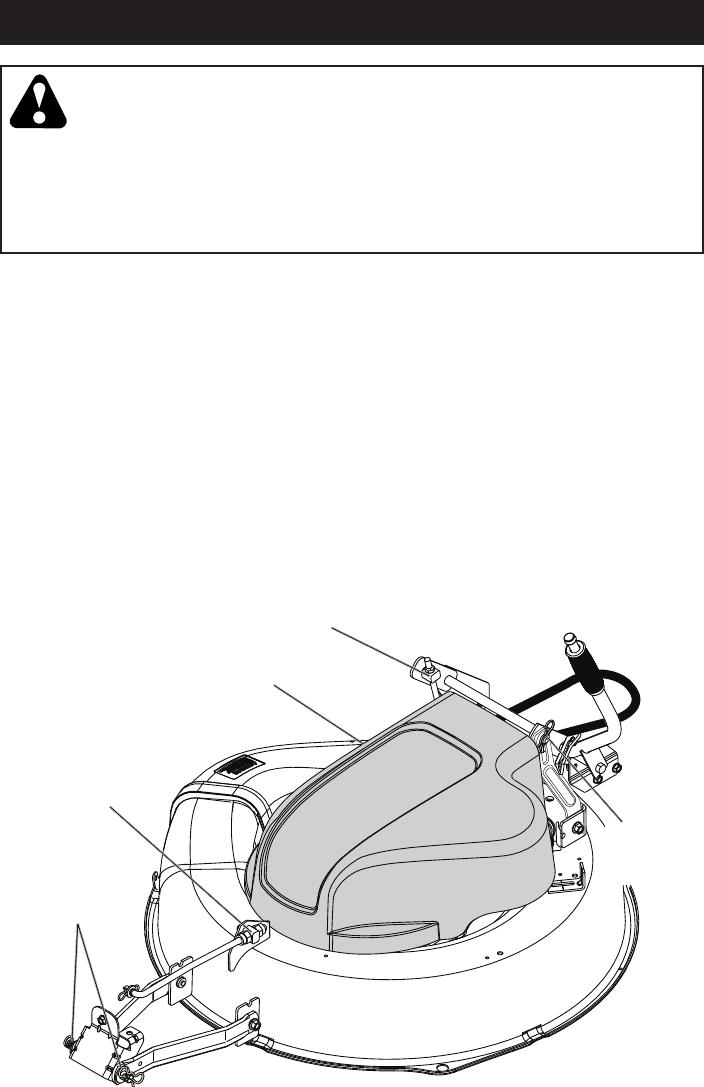
RETIRO DE LA CORTADORA DE CÉSPED
1. Coloque el embrague de la plataforma en la
posición “DESACTIVADO”.
2. Mueva la palanca del elevador de ajuste
de altura de la cortadora de césped hacia
adelante para ba jar la cortadora de césped
a su po si ción más baja.
3. Retire la cubierta del mandril.
4. Retire los pasadores que sostienen en su lugar
los brazos de suspensión frontales izquierdo
y derecho de la cortadora de césped.
5. Retire el perno que sostiene en su lugar
la varilla de nivelación del frente a la parte
posterior de la plataforma.
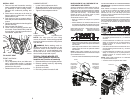
INSTALACIÓN DE LA CORTADORA DE
CÉSPED
Instale en reversa de acuerdo con las instrucciones
de la sección "RETIRO DE LA CORTADORA DE
CÉSPED".
6. Retire el pasador que sostiene en su lugar el
brazo del eslabón del elevador de la platafor-
ma.
7. Retire el perno que sostiene en su lugar la
varilla de nivelación de lado a lado de la
plataforma.
8. Retire la cinta del rededor de las poleas.
9. Deslice la plataforma hacia afuera desde el
lado inferior de la cortadora de césped.
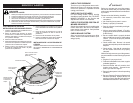
ADVERTENCIA: PARA EVITAR UNA LESIÓN SERIA, ANTES DE HACER
CUALQUIER
SER VICIO O A JUST E:
1. Suelte por completo el pedal de embrague/freno y accione el freno de estacionamiento.
2. Coloque la palanca de control de movimiento en la posición neutral (N).
3. Coloque el embrague de la plataforma en la posición “DESACTIVADO”.
4. Gire la llave de arranque a la posición “PARADA” y saque la llave.
5. Asegúrese de que la cuchilla y todas las partes móviles se hayan detenido por completo.
6. Desconecte el cable de la bujía de ésta última y coloque el cable donde no pueda
entrar en contacto con la bujía.
Perno de varilla de lado
a lado nivelador de la
plataforma
Cubierta de mandril
Perno de varilla
de nivelación
frontal
Pasador del brazo
de suspensión de
la cortadora de
césped
Pasador del
eslabón del
elevador de la
plataforma
SERVICIO Y AJUSTES
9
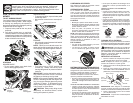
CHECK TIRE PRESSURE
The tires on your riding mower were overin-
flated at the factory for shipping purposes.
Correct tire pressure is important for best
cutting performance.
CHECK DECK LEVELNESS
For best cutting results, mower housing
should be properly leveled. See “TO LEVEL
MOWER HOUSING” in the Service and
Adjustments section of this manual.
CHECK FOR PROPER POSITON OF
MOWER DRIVE BELT
See the figure that is shown for replacing the
mower drive belt in the service and adjust-
ment section of this manual. Verify that the
belt is routed correctly.
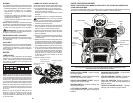
CHECK BRAKE SYSTEM
After you learn how to operate your riding
mower, check to see that the brake is oper-
ating properly.
✓CHECKLIST
Before you operate your new riding mower,
we wish to assure that you receive the best
performance and satisfaction from this Qual-
ity Product.
Please review the following checklist:
✓ All assembly instructions have been
com plet ed.
✓ No remaining loose parts in carton.
✓ Battery is properly connected.
✓ Seat is adjusted comfortably and tight-
ened securely.
✓ All tires are properly inflated. (For ship-
ping purposes, the tires were overinflated
at the factory.)
✓ Be sure mower deck is properly leveled
side-to-side/front-to-rear for best cutting
results. (Tires must be properly inflated
for leveling.)
✓ Check mower belt. Be sure it is routed
properly around pulleys and inside all belt
keepers.
✓ Check wiring. See that all connections
are still secure and wires are properly
clamped.
While learning how to use your riding mower,
pay extra attention to the following important
items:
✓ Engine oil is at proper level.
✓ Fuel tank is filled with fresh, clean, regular
unleaded gasoline.
✓ Become familiar with all controls, their
location and function. Operate them
before you start the engine.
✓ Be sure brake system is in safe operating
condition.
✓ Be sure Operator Presence System and
Reverse Operation System (ROS) are
working properly (See the Operation and
Maintenance sections in this manual.)