


38
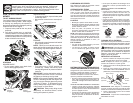
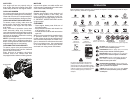
CONOZCA SU CORTADORA DE CÉSPED
LEA ESTE MANUAL DE OPERARIO Y LAS REGLAS DE SEGURIDAD ANTES DE OPERAR SU
CORTADORA DE CÉSPED
Compare las ilustraciones con su cortadora de césped para familiarizarse con las ubicaciones de los
diferentes controles y a just es. Conserve este manual para futuras consultas.
Nuestra cortadora de césped cumple con las normas de seguridad aplicables del
Instituto Nacional Estadounidense de Norm as.
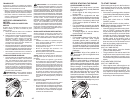
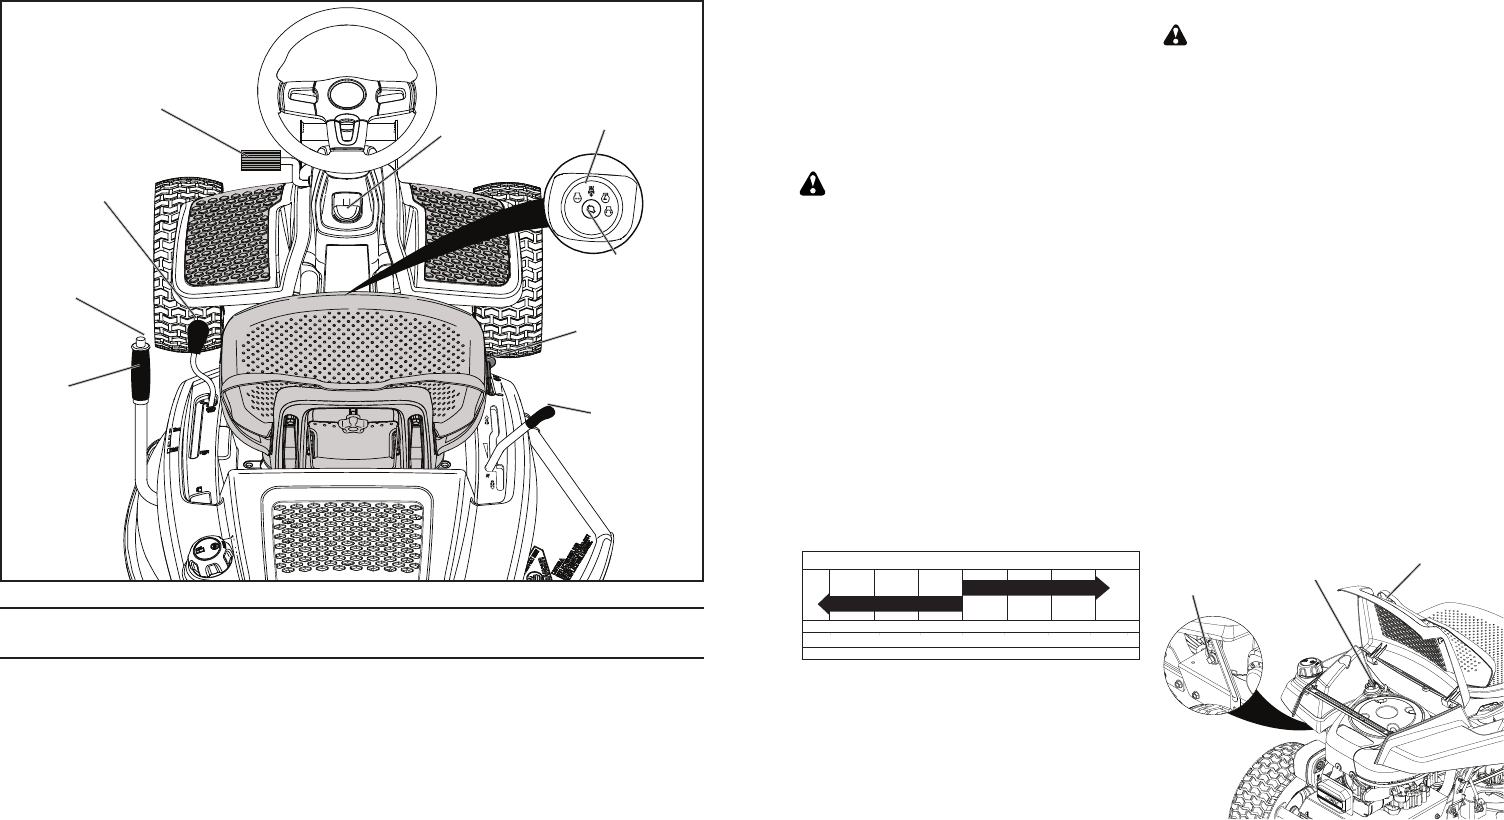
PALACA DEL EMBRAGUE DE LA PLATA-
FORMA - Se usa para activar la cuchilla de la
cortadora de césped.
FRENO DE ESTACIONAMIENTO - Se usa para
fre nar la cortadora de césped y arrancar el motor.
PALANCA DE AJUSTE DE ALTURA - Se usa
para ajustar la altura de corte de la cortadora
de césped.
INTERRUPTOR DE ARRANQUE - Se usa para
arrancar y detener el motor.
ÉMBOLO DE LA PALANCA DEL ELEVADOR -
Se usa para sol tar la palanca de ajuste de altura
cuando se cam bia su posición.
PALANCA DE FRENO DE ESTACIONAMIENTO
- Fija el freno de estacionamiento en la posición
de freno.
PALANCA DE CONTROL DE MOVIMIENTO -
Selecciona la velocidad y dirección de la cortadora
de césped.
INTERRUPTOR DEL SISTEMA DE FUNCIONA-
MIENTO HACIA ATRÁS (ROS) EN POSICIÓN
“ON” - Permite la operación del conjunto segador
o otro accesorio accionado mientras que en revés.
CONTROL DE ACELERACIÓN/ESTRANGULA-
CIÓN - Se usa para hacer arrancar y controlar la
velocidad del motor.
Interruptor
de arranque
Émbolo de la
palanca del
elevador
Palanca
de ajuste
de altura
Palanca del
embrague de la
plataforma
Pedal del freno
Freno de
estacionamiento
(ROS) en
posición “on”
Control De
Aceleración/
Estrangulación
Palanca de
control de
movimiento
19
BATTERY
Your riding mower has a battery charging
sys tem which is suf fi cient for normal use.
• Keep battery and connectors clean.
• Only recharge battery with charger
approved for a 12V 6 amp. hour battery.
• Charging with any other charger or an
automotive style charger can cause per-
manent damage to the battery.
• Charge battery for 24 hours for a full
charge.
NOTE: The original equipment battery on
your riding mower is maintenance free. Do
not attempt to open or remove caps or cov-
ers. Adding or checking level of elec tro lyte
is not necessary.
WARNING: Do not jump start battery.
Permanent damage to the battery or personal
injury may occur.
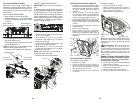
TRANSAXLE COOLING
Keep transaxle free from build-up of dirt and
chaff which can restrict cooling.
V-BELT
Check V-belt for deterioration and wear after
100 hours of operation and replace if neces-
sary. The belt is not ad just able. Re place belt
if it begins to slip from wear.
NOTE: Al though multi-vis cos i ty oils (5W30,
10W30 etc.) im prove start ing in cold weather,
the oils will result in increased oil consumption
when used above 32°F. Check your engine
oil level more frequently to avoid possible
engine damage from running low on oil.
Change the oil after every 25 hours of
operation or at least once a year if the riding
mower is not used for 25 hours in one year.
Check the crankcase oil level before starting
the engine and after each eight (8) hours
of operation. Tighten oil fill cap/dipstick
securely each time you check the oil level.
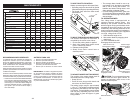
ENGINE
LUBRICATION
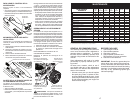
Only use high quality detergent oil rated with
API service classification SG-SL. Select the
oil’s SAE viscosity grade according to your
expected operating temperature.
TEMPERATURE RANGE ANTICIPATED BEFORE NEXT OIL CHANGE
SAE VISCOSITY GRADES
-20 0 30 40
80
100
-30
-20 0
20 30 40
F
C
32
-10
10
60
5W-30
SAE 30
oil_visc_chart1_e
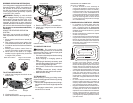
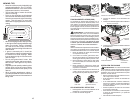
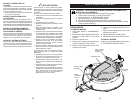
Engine Cover
Oil Fill Cap/Dipstick
Drain Plug
TO CHANGE ENGINE OIL
Determine temperature range expected
before oil change. All oil must meet API
service classification SG-SL.
• Be sure riding mower is on level surface.
• Oil will drain more freely when warm.
• Catch oil in a suitable container.
CAUTION: If engine has been operated
for an extended period of time immediately
prior to draining oil, oil will be hot.
1. Lift engine cover.
2. Remove oil fill cap/dipstick. Be careful
not to allow dirt to enter the engine when
changing oil.
3. Position a container to catch oil.
4. Remove drain plug and drain oil into
container.
5. After oil has drained completely, replace
oil drain plug and tighten securely.
6. Refill engine with oil through oil fill dip-
stick tube. Pour slowly. Do not overfill.
For approximate capacity see “PROD-
UCT SPECIFICATIONS” section of this
manual.
7. Use gauge on oil fill cap/dipstick for
checking level. For accurate reading,
tighten dipstick cap securely onto the
tube before removing dipstick. Keep oil
at “FULL” line on dipstick. Tighten cap
onto the tube securely when finished.
8. Lower engine cover.