


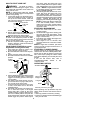
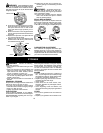
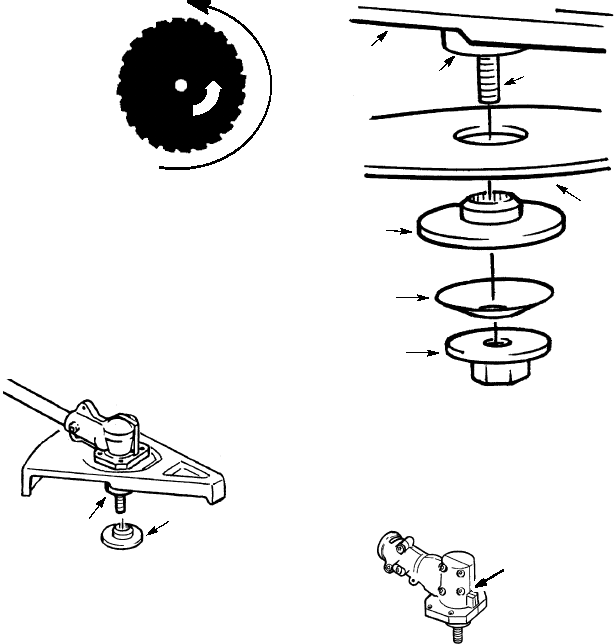
7
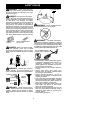
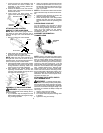
Teeth on
blade point in
this direction
Top view of blade
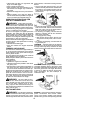
NOTE:
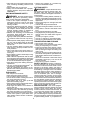
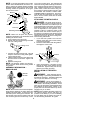
The dust cup and retaining washer
arelocated on the gearbox andnot intheparts
bag. All other fasteners mentioned in the fol-
lowing assembly steps are in t he parts bag.
1. Remove the retainer washer from the
gearbox, and leave the dust cup on the
gearbox.
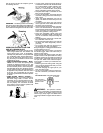
NOTE:
It may be necessary to
remove a plastic protective covering from
the threaded shaft before removing the re-
taining washer.
Retaining
Washer
Dust Cup
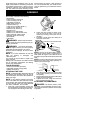
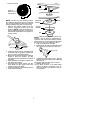
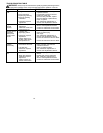
2. Install the blade over the threaded shaft
extending from the gearbox between the
dust cup and the retaining washer .
3. Make sure t he raised part of the retaining
washer is facing the gearbox, and the
raised areafitsinto the hole inthecenterof
the blade.
4. Slide the blade and retaining washer onto
the shaft of the gearbox.
5. Now place the cupped washer onto the
shaft. Make sure the cupped side of the
washer is toward the blade.
6. Install the blade nut by threading onto the
shaft counterclockwise.
Shield
Blade
Retaining
Washer
Dust Cup
Cupped
Washer
Nut
Threaded
Shaft
NOTE:
Make sure all parts arein place as il-
lustrated, and the blade is sandwiched be-
tween the dust cup and the retaining washer.
There should be no space between the blade
and the dust cup or the retaining washer.
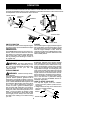
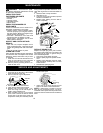
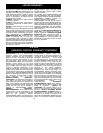
7. Push in locking lever and hold.
8. Rotate bladenut until thelocking leverfalls
into one of the grooves in the dust cup.
Locking Lever
9. Continue to hold in locking lever. This w ill
keep the shaft from turning while t ightening
the blade nut .
10. Tighten blade nut firmly with a wrench.
11. Release locking lever.
12. Turn blade by hand. If the blade binds
against the shield, or appears to be un-
even, the blade is not centered, and you
must reinstall.