


12
MAINTENANCE
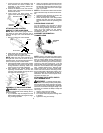
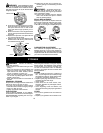
WARNING:
Disconnect the spark
plug before performing maintenance except
for carburetor adjustments.
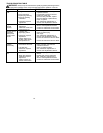
CHECK FOR LOOSE
FASTENERS AND PARTS
S
Spark Plug Boot
S
Air Filter
S
Housing Screws
S
Handlebar Screws
S
Debris Shield
CHECK FOR DAMAGED OR
WORN PARTS
Contact an aut horized service dealer for re-
placement of damaged or worn parts.
S
ON/OFF Switch -- Ensure ON/OFF switch
functions properly by moving the switch to
the OFF position. Make sure engine stops.
Restart engine and continue
S
Fuel Tank -- Discontinue use of unit if fuel
tank shows signs of damage or leaks.
S
Debris Shield -- Discontinue use of unit if
debris shield is damaged.
INSPECT AND CLEAN UNIT AND
DECALS
S
After each use, inspect complete unit for
loose or damaged parts. Clean the unit and
decals using a damp cloth with a milddeter-
gent.
S
Wipe off unit with a clean dry cloth.
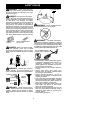
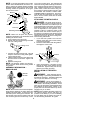
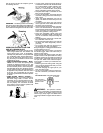
CLEAN AIR FILTER
Adirtyair filter decreases engine performance
and increases fuel consumption and harmful
emissions. Always clean after every 5 hours
of operation.
1. Clean the cover and the area around it to
keep dirt from falling into the carburetor
chamber when the cover is removed.
2. Remove parts by pressing button to re-
lease air filter cover.
NOTE:
Toavoid creating afirehazard orpro-
ducing harmful evaporative emissions, do not
clean filter in gasoline or other flammable sol-
vent.
3. Wash t he filter in soap and water.
4. Allow filter to dry.
5. Adda fewdrops of oil to the filter; squeeze
the filter to distribute oil.
6. Replace parts making sure the filter is
seated completely.
Air Filter
Cover
Screws
Air Filter
Back
view of
Air Filter
Cover
REPLACE SPARK PLUG
Replace the spark plug each year to ensure
the engine starts eas ier and runs better. Set
spark plug gap at 0.025 in. Ignition timing is
fixed and nonadjustable.
1. Twist, then pull off spark plug boot.
2. Remove spark plug from cylinder and dis-
card.
3. Replace with Champion RCJ-6Y spark
plug and tighten securely with a 3/4 i nch
socket wrench..
4. Reinstall the spark plug boot.
SERVICE AND ADJUSTMENTS
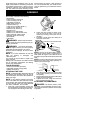
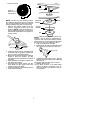
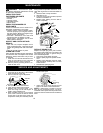
REPLACING THE LINE
1. Press the tab on the s ide of the trimmer
head and twist t he lock ring.
2. Remove the lock ring and tap button.
Tab
Lock Rin
g
Tap Button
Trimmer
Head
3. Pull spool out of the t rimmer head.
4. Clean dirt and debris from all parts.
5. Replace with a pre-wound spool , or re-
place line using two 20 feet lengths of
0.080
!
(2 mm) diameter line.
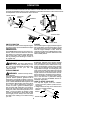
6. When installing new line on an existing
spool, insert 1/16th of the line into the an-
choring hole in the bed of the spool, and
wraptheline evenly and and firmly around
the spool in the direction of the arrow
found on the spool.
Anchoring
Hole
7. Insert ends of the lines through the exit
holes in the sides of the trimmer head.
NOTE:
A metal insert is located in the exit
hole. As your unit wears from use, you canre-
install this insert upside downtoprovide anew
surface for the exit of the line from the trimmer
head.