


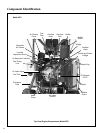


Assembly Instructions
22
SETUP INSTRUCTIONS
Walker Mowers are shipped partially assembled.
After uncrating the tractor and mower deck, initial
setup is required.
NOTE: During the process of unpacking, any dam-
aged or missing parts should be noted and reported
to the delivering carrier immediately (put in writing
within 15 days). The carrier will provide directions
for proceeding with a claim to receive compensation
for damage.
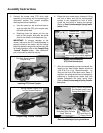
Tire Installation (Tractor)
• Install the drive tires using the eight (8) lug bolts
that are supplied with the owner’s packet of materi-
als. Bolts are torqued to 75 to 85 ft-lb. Drive tires are
18 x 9.50-8, 4-ply; rear tires are 13 x 5.00-6, 4-ply.
• Check and adjust the inflation of the tires. The
tire inflation recommendations are:
Drive = 15 PSI (103 kPa)
Rear = 20 PSI (137 kPa)
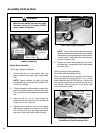
Battery Service
Raise front mower body up for battery access (refer
to Front Body Latch Release in Operating Instruc-
tions). Check the battery for electrolyte level and
charge. The electrolyte level should be at the bot-
tom of the vent wells [1/4 to 1/2 in. (6 to 13 mm)
above plates]. If the specific gravity is less than
1.225, the battery needs charging. If the battery
has been shipped dry, or is wet but needs service,
refer to the following instructions.
IMPORTANT: Make sure battery is securely
mounted in the frame. A loose battery may cause
damage to the case resulting in acid leakage and se-
vere damage to the machine. A hazard may be cre-
ated by damage to critical working parts and safety
systems.
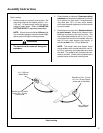
Wet Battery Service
If the battery has been shipped wet, but the electro-
lyte level is low or the battery needs to be charged
then:
1. Fill each battery cell with drinking water to the
bottom of the vent wells.
2. Charge battery. Refer to Battery Charging in
this section.
Dry Battery Service
CAUTION
Important Battery Service, Installation, and
Changing Tips for MTEFI:
• Do not allow the battery cables to touch
opposing terminals. When connecting
battery cables attach the positive (+) cable
to positive (+) battery terminal first, followed
by negative (-) cable to negative (-) battery
terminal.
• Never start the engine when the cables
are loose or poorly connected to the
battery terminals.
• Never disconnect battery while engine is
running.
• Never use a quick battery charger to
start the engine.
• Never "jump start" the engine using
another source. Electricity fluctuations can
damage the ECU (Electronic Control Unit).
• Do not charge battery with key switch
"on."
• Always disconnect negative (-) battery
cable lead before charging battery, and
also unplug harness from ECU before per-
forming any welding on equipment.
DANGER
Activating a battery can be dangerous.
The battery should be taken to a reliable
service station, battery store, or power
equipment dealer where a trained techni-
cian can activate the battery safely. DO
NOT attempt to activate the battery unless
you are experienced in battery service
work. The following activation and charg-
ing instructions are provided for use by a
trained battery technician.