


Section2: Assembly
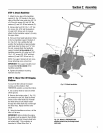
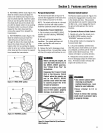
STEP4: Install ForwardClutch Cable
1. Carefully unwrap the forward clutch
cable (the cablewithout a knobattachedto
it) from its shipping position and slidethe
thin cable wire (T, Fig.2-4) into the slot in
the cablebracket. Pushthe cableconnector
(U, Fig.2-4) up through the hole in the
bracket until the groove in the connector
snaps into place on the bracket.
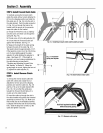
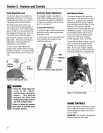
2. Threadthe #10-24 hex nut (Z) halfway
onto the screw (V) which runsthrough the
spring (W, Fig.2-5).
3. Thread screw (V) intocable adjuster (X).
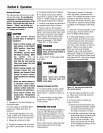
4. Lift and hold the ForwardClutch bail
against the handlebar.SeeFig.2-7.
5. Measurethe lengthof the cablespring
betweenthe ends of the coils (Fig.2-7).
The length should beapproximately 1-7/8".
If the length is correct, turn the #10-24 hex
nut (Z) down tightly againstthe cable
adjuster (X) while holding the adjuster in
place. SeeFigure 2-7. If the length is
incorrect, you must makean adjustment to
the cable tension as described in
"Checking andAdjusting ForwardDrive
BeltTension" in Section 5. Whenthe
spring length is correct, tighten the hex nut
(Z) against the cable adjuster (X).
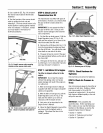
STEP5: Install ReverseClutch
Cable
1. Unwrapthe reverseclutch cable (the
cable with a knoband a large hex nut
attached to it) from around its shipping
position and route the cable(CC,Fig.2-8
and Fig. 2-9) up to the cable bracket (BB,
Fig.2-8). Besure that the cablegoes
beneaththe ForwardClutch Bail asit is
routed upto the cable bracket.
2. Insert the cable up through the slot in
the cable bracketand position the threaded
assembly asshown in Fig.2-8. Makesure
that the flat side of thethreaded assembly
is aligned with the flat side of the mounting
hole. Slide the large hex nut (DD) up the
cable and tighten it securely.
Fig. 2-4: Installing forwardclutchcable bracket and cable.
Fig. 2-5: Assemble
springand adjuster.
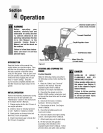
Fig. 2-6: Install forwardclutch cable.
Fig. 2-7: Measure cable spring.