


INTRODUCTION
Read these instructions in their entirety
before you attempt to assemble or op-
erate your new equipment.
The Border/Edger Attachment (H, Figure
5) does not need to be installed until you
are ready to do edging projects (refer to
instructions in this Section).
IMPORTANT: The correct mixture of un-
leaded automotive gasoline and two-cycle
motor oil (a 24:1 ratio of gasoline to two-
cycle oil) must be added to the fuel tank
before starting the engine. See instruc-
tions in this Section.
UNPACKING INSTRUCTIONS
1. Inspect your machine immediately. If
you find or suspect damage to the carton
or contents, contact your local authorized
dealer or the Factory for assistance.
2. Remove any packing material. Check
for small parts before discarding the
packing material. Loose parts include the
following:
(1) Bottle of 2-Cycle Oil
(1) Wheel (for edging)
(1) Edger Tine
(2) *Long Bushings
(1) *Short Bushing
* Packed in a separate plastic bag.
3. Perform the assembly on a clean, level
surface. Be careful not to severely bend
any of the control cables on the unit.
4. Before starting any assembly steps,
disconnect the engine spark plug wire
from the spark plug.
ASSEMBLY STEPS
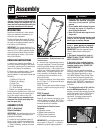
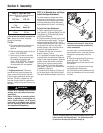
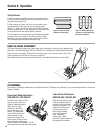
STEP 1: Unfold and
Adjust Handlebars
IMPORTANT: Be careful not to pinch any
wires or cables while unfolding and ad-
justing the handlebars.
1. Loosen the two handlebar knobs (A,
Figure 1) and unfold the handlebars into
the operating position. Do not use force
— if there is binding, continue to loosen
the knobs.
2. There are two height settings holes in
the upper handlebar. The unit is shipped
with the handlebar knobs in the lowest
height setting holes. If this height is cor-
rect for you, simply tighten the two han-
dlebar knobs. If a higher setting is de-
sired, reposition the handlebar knobs,
mounting screws and washers in the
other set of holes.
3. Check the locations of the three plastic
ties (C, Figure 1). The ties must be posi-
tioned as shown.
NOTE: There is just one handlebar storage
position – folded over the engine as origi-
nally shipped.
STEP 2: Inspect
and Tighten Hardware
Check all nuts, bolts and screws on your
unit and tighten as needed. NOTE: Use a
7/16" socket with an extension to check
hardware at ends of handlebar.
Tools Needed to Check for Loose
Hardware:
•
Adjustable wrench
• Slotted-head screwdriver
• Phillips-head screwdriver
• 7/16" socket and extension
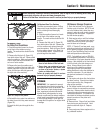
IMPORTANT: Do not tighten engine gov-
ernor screw (D, Figure 2). It is factory-
adjusted for proper engine operation.
STEP 3: Add a Mixture of Gasoline
and Two-Cycle Oil to the Fuel Tank
IMPORTANT: Read the separate Engine
Owner’s Manual before starting the
engine.
1. Use clean, high quality 2-cycle oil,
NMMA TC-WII or TC-W3. DO NOT USE
MULTI-VISCOSITY OIL!
2. Use fresh, clean, unleaded regular,
unleaded premium or reformulated au-
tomotive gasoline only. DO NOT USE
LEADED GASOLINE.
NOTE: Do not use gasoline containing
methanol (wood alcohol). Fuel containing
up to 10% ethanol (gasohol) or up to
15% MTBE (Methyl Tertiary Butyl Ether)
may be used, but requires special care
when the engine is not used for extended
periods. See “STORAGE” instructions in
Engine Owner’s Manual for additional in-
formation.
3. The fuel/oil mix ratio is 24:1 with the
use of a NMMA classified oil. For new
engines, use twice the normal oil quantity
for the first gallon of fuel.
NOTE: Due to
differences in fuel and oil availability
worldwide, Tecumseh recommends a
16:1 mix ratio if NMMA oil is not
available.
Assembly
2
Section
Figure 1: Loosen handlebar knobs and
unfold handlebars. Slide plastic ties to the
locations shown.
A
A
C
B
C
C
Figure 2: Do not adjust or tighten the engine
governor screw.
D
• Gasoline and its vapors are highly
flammable and explosive. Keep gaso-
line away from possible ignition
sources.
• Do not smoke while mixing the gaso-
line and two-cycle oil together or
when filling the fuel tank.
• Never fill fuel tank when engine is run-
ning or hot.
Failure to follow these precautions could
result in the fuel igniting, causing per-
sonal injury or property damage.
DANGER
5
To prevent personal injury or property
damage, do not start the engine until all
assembly steps are complete and you
have read and understand the safety and
operating instructions in this manual.
WARNING