


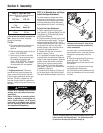
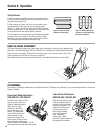
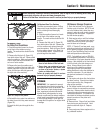


Arranging Tines
for Stony Soil Conditions
1. Prop the machine forward so it rests
on the front of the tubular carrying
handle. The work surface should be flat
and firm.
2. Remove the hitch pin (A, Figure 16)
from both sides of the unit. Remove both
outer tine sections. Mark each section as
a left or right side tine and whether it is
an inner or outer section.
3. Remove the inner tine sections and
swap their positions (the inner right-side
section goes onto the left side of the ma-
chine, and the inner left-side goes onto
the right side of the machine).
4. Reinstall the two outer tine sections on
the sides from which they were removed
(Figure 18).
5. Insert the hitch pins through the tine
shafts.
To Replace Worn Tine Sections:
The tines are excessively worn if tilling
takes much longer than before and the
soil is not being mixed thoroughly
enough.
1. Prop the machine forward so it rests
on the front of the tubular carrying
handle. The work surface should be flat
and firm.
2. Remove the hitch pin (A, Figure 16)
from both sides of the unit. Remove the
old tine sections and replace them with
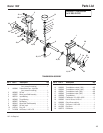
new tine sections. Refer to Figure 16 and
the tine pattern shown in the
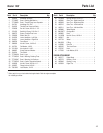
Parts List
for tine pattern details. Insert the hitch
pins through the tine shafts.
STORAGE
IMPORTANT: It is important to prevent
gum deposits from forming in essential
fuel system parts such as carburetor, fuel
filter, fuel hose, or tank during storage.
Also, experience indicates that alcohol-
blended fuels (called gasohol or using
ethanol or methanol) can attract moisture
which leads to separation and formation
of acids during storage. Acidic gas can
damage the fuel system of an engine while
in storage.
Off-Season Storage Procedure
1. Drain the fuel tank of all of the gaso-
line/two-cycle oil mixture. NOTE: Do not
use a fuel mixture that is older than one
season in order to avoid varnish deposits
throughout the fuel system. Dispose of
the fuel mixture properly.
2. Start engine and run until fuel mixture
is used up. This will prevent poor perfor-
mance from stale fuel when your equip-
ment is taken out of storage.
NOTE: If “Gasohol” has been used, com-
plete above instructions and then put 1/2
pint of gasoline properly mixed with two-
cycle oil (see Fuel Mixing Chart) into fuel
tank and repeat above instructions.
NOTE: Fuel stabilizer (such as STA-BIL)
is an acceptable alternative in minimizing
the formation of fuel gum deposits during
storage. Add stabilizer to the fuel mixture
in the fuel tank or the fuel storage con-
tainer. Always follow the mix ratio in-
structions on the stabilizer container.
Run engine at least 10 minutes after
adding stabilizer to allow the stabilizer to
reach the carburetor. Do not drain the
gas tank and carburetor if using fuel
stabilizer.
3. Let engine cool down after fuel mixture
has been used up. Clean dirt and debris
from engine cooling fins, linkage and
other engine surfaces.
4. Pull starter handle slowly until resis-
tance is felt due to compression pressure,
then stop. Release starter tension slowly
to prevent engine from reversing due to
compression pressure. This position will
close both the intake and exhaust ports to
prevent corrosion of the piston and
cylinder bore.
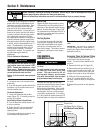
5. Remove tines. Clean all soil and debris
from dust covers and tine shaft. Lubri-
cate tine shaft with light oil. Replace
tines.
6. Cover engine and store equipment in a
dry, sheltered location.
Figure 17: Narrow tilling tine positions.
Figure 18: Stony soil tine pattern.
• Never store your equipment when
there is fuel mixture in the fuel tank.
• Never place your equipment near any
source of sparks or open flame (such
as from a hot water heater, a space
heater or clothes dryer).
Failure to comply can result in serious
personal injury or property damage.
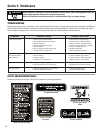
WARNING
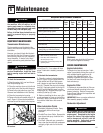
Section 5: Maintenance
13
Before inspecting, cleaning or servicing the machine, shut off engine, wait for moving parts to stop, dis-
connect spark plug wire and move wire away from spark plug.
Failure to follow these instructions can result in serious personal injury or property damage.
WARNING
B