


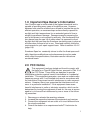

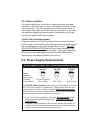


BLUE
BLUE
BROWN
BROWN
GRN
1
2
TB1
All Export Models:
230-240 VAC, 3-Wire (50/60 Hz)
to Circuit
Board
Power In
fig. I
7.0 Start-Up Instructions
Congratulations! You are now all set to get your new spa ready to
use. Simply follow this step-by-step procedure and, before long, you
will be enjoying your first glorious experience in your Portofino spa.
For best results, read each step in its entirety before proceeding
with that step.
During power-up, the control panel will display a
series of start-up displays. Refer to section 9.0 (page 12) for
additional information.
7.1 Filling the Spa
Clear all debris from the spa. Although the spa shell has been
polished at the factory, you may want to treat it with a specially
formulated spa cleaner. For more information, consult your dealer
prior to filling it. Only spas with a smooth acrylic surface require
waxing. It is not necessary to wax spas with the textured Quarite™
surface.
Remove the filter cover, then remove the filter cartridge as outlined
in section 10.1 (Page 17-18). Place the end of your garden hose into
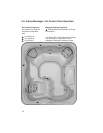
the filter compartment, then fill spa. For Solo models only - fill the
spa with water from a garden hose until the water level is just below
the neck jets.
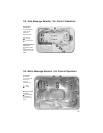
Refer to section 14.1 (page 29).
For Metro and
Caprio models, fill until water level is halfway up the filter skimmer.
Refer to sections 14.2-14.3 (page 30).
Do not overfill. Never fill
with water from a water softener. If your water is extremely “hard”, it
is preferable to fill half way with hard water and the rest of the way
with softened water. Or, you may fill entirely with hard water if you
use a special water additive available from your Portofino dealer.
9