


34
Troubleshooting, Adjustment, & Service
PTO BELT REPLACEMENT
1. With the mower deck installed, park the tractor on a
smooth, level surface such as a concrete floor.
Disengage the PTO, engage the parking brake, shut
the engine off, and remove the key.
2. Remove the mower deck (see “Mower deck
removal”). Remove the belt covers.
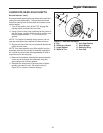
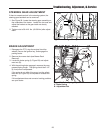
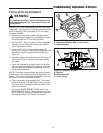
3. Note the position of the idler pulley belt guide (E,
Figure 38). Loosen the idler pulley capscrew and
remove the belt from the pulley (D).
4. Install the new belt (B) as shown. When the mower
deck is installed on the tractor, the belt wraps around
the PTO clutch pulley (A), idler pulley (D) and mower
deck drive pulley (C).
5. Return the idler pulley belt guide (E) to its original
position and tighten the idler pulley capscrew.
ARBOR DRIVE BELT REPLACEMENT
1. With the mower deck installed, park the tractor on a
smooth, level surface such as a concrete floor.
Disengage the PTO, engage the parking brake, shut
the engine off, and remove the key.
2. Remove the mower deck (see “Mower Deck
Removal”). Remove the belt covers.
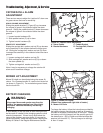
3. Loosen the idler assembly capscrew (G, Figure 38).
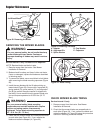
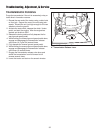
4. Using a ratchet (A, Figure 39), move the idler assem-
bly (H) to relieve tension on the belt (F).
5. Remove the belt (F).
6. Install a new belt (F) on the pulleys as shown.
Releasing the idler assembly (H) allows the spring to
automatically tension the cogged belt.
7. Tighten the idler assembly capscrew (G). Reinstall
the belt covers.
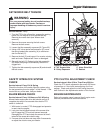
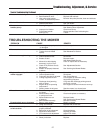
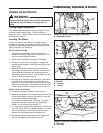
8. Check that the blades are positioned perpendicular to
each other as shown in Figure 40. If not, perform the
mower blade timing procedure found in the “Regular
Maintenance” section.
A
B
C
D
E
Figure 38. Mower Belts
A. PTO Pulley (Engine)
B. PTO Belt
C. Mower Deck Drive Pulley
D. Idler Pulley
E. Belt Guide
F. Arbor Drive Belt
G. Idler Capscrew
H. Idler Assembly Bracket
Figure 39. Release Belt Tension
A. 3/8” Ratchet and Extension
Figure 40. Mower Blade Alignment
H
G
F
A