


18
Operating the Tractor
MULCH PLUG INSTALLATION &
REMOVAL (SOME MODELS)
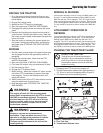
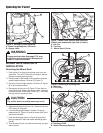
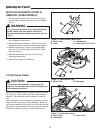
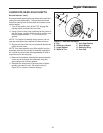
1. Secure plate (B, Figure 12) to the mulch plug (A)
using 1/4-20 x 3/4 capscrews (D) and 1/4 lockwash-
ers (C).
2. Remove the mower deck from the unit. See the
unit’s Operating Instructions.
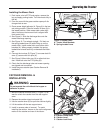
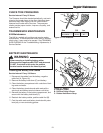
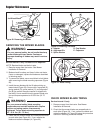
3. Insert mulch plug assembly (A, Figure 13) into dis-
charge (B) from the under side of the mower deck.
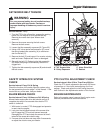
4. Secure mulch plug (A, Figure 14) by sliding latch
lever into (C) into mulch plug (A) as shown. Slide
latch all the way in.
5. Reinstall mower deck onto unit. See the unit’s
Operating Instructions.
6. Removal is reverse of installation.
Figure 13. Install Mulch Plug
A. Mulch Plug B. Discharge
B
A
Figure 14. Install Latch Lever
A. Mulch Plug C. Latch Lever
B. Discharge
C
A
B
WARNING
For your personal safety, do not handle the sharp
mower blades with bare hands. Careless or
improper handling of blades may result in serious
injury.
Figure 12. Install Plate to Mulch Plug
A. Mulch Plug C. Lockwashers
B. Plate D. Capscrews, 1/4-20 x 3/4
A
B
D
C
C
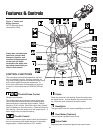
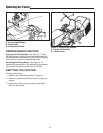
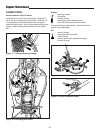
12 Volt Power Outlet
The 12-volt accessory plug is located in the left side pod
(D, Figure 2). It can be used to power small electronic
devices. The accessory must be rated at 14 amps or
less.
Note: Operating a 12-volt accessory, especially with the
engine at idle, may cause battery discharge. When not
using the accessory plug it must be covered with the rub-
ber plug to prevent moisture from causing a short circuit.
Entrance of water into plug can cause a short circuit.
CAUTION
Avoid Injury. Safe operation requires your full
attention. Do not wear radio or music headphones
while operating machine.