


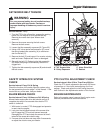

SERVICING THE MOWER BLADES
Service Interval: Every 100 Hours or As Required
NOTE: Replace blades and bolts in sets.
1. Remove mower from the tractor. See Mower
Installation & Removal.
2. Blades should be sharp and free of nicks and dents.
If worn or damaged, replace the blades as described
in following steps.
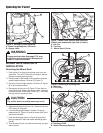
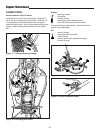
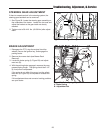
3. To remove the blade, use a wood block to hold blade
while removing the blade mounting capscrew (Figure
22).
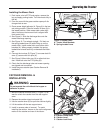
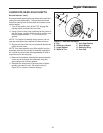
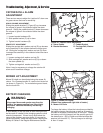
4. Install the new blades with the lift tabs pointing up
toward deck (Figure 23). Secure with a capscrew (E),
spring washer (D), spline washer (C), and alignment
pin (B) (be certain the spline washer is aligned with
the shaft). Use a wooden block to prevent blade rota-
tion and torque capscrews to 45-55 ft.lbs. (61-75
N.m.).
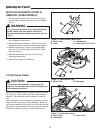
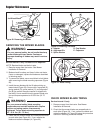
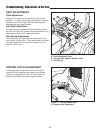
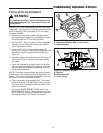
5. Check that the mower blades are timed perpendicular
to each other (see Figure 24). If not, remove the
blade and rotate the adapter (A, Figure 23).
WARNING
For your personal safety, do not handle the sharp
mower blades with bare hands. Careless or
improper handling of blades may result in serious
injury.
WARNING
For your personal safety, blade mounting
capscrews must each be installed with a spline
washer and spring washer, then securely
tightened. Torque blade mounting capscrew to
45 - 55 ft. lbs. (61 - 75 N.m.)
LOOSEN
Figure 22. Removing the Blade
Figure 23. Installing The Blade
A. Adapter D. Cup Washer
B. Alignment Pin E. Capscrew
C. Spline Washer
Figure 24. Blade Timing
4x4 Wood Block
24
Regular Maintenance
A
B
C
D
E
CHECK MOWER BLADE TIMING
Service Interval: Yearly
1. Remove mower from the tractor. See Mower
Installation & Removal.
2. Check that the mower blades are perpendicular to
each other (Figure 24). If not, remove the blade and
rotate the adapter (A, Figure 23) using the procedure
outlined in Servicing the Mower Blades