


Installation
Ball Joint Replacement
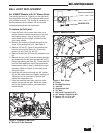
BALL JOINT REPLACEMENT
For IS2000Z Models with 52” Mower Deck:
The existing ball joint (A, Figure 2) on the right-hand
front suspension arm has to be replaced with the ball
joint provided in the kit. This change is necessary to
provide clearance for the blower unit and must be
completed before blower unit installation.
To replace the ball joint:
1. Lower the front of the mower deck down on to
wooden blocks to relieve the tension on the front
deck hanger chains. Jack up the front of the
tractor frame until the weight is lifted off of the
front caster wheels.
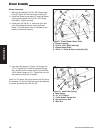
2. Measure the amount of threads showing on the
shank of the existing ball joint. See Figure 3.
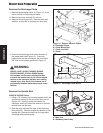
3. Remove 3/4” bolt (E, Figure 4) that attaches the
ball joint to the tractor frame (A). Discard the
spacers (H and I) and 3/4” bolt (E).
4. Remove the ball joint (B) from the suspension arm
(D).
5. Remove the jam nut (C) from the existing ball joint
and thread onto the ball joint provided with kit (F).
Discard the existing ball joint (B). Thread new ball
joint into the suspension arm to the approximate
measurement taken in step 2, allowing for correct
orientation (Refer to Figure 4) of the ball joint to
the tractor frame.
6. Install the ball joint stud through the 3/4” washer
(G) and the tractor frame and tighten securing nut.
Tighten jam nut on the shank of the ball joint
against the suspension arm.
7. Lower the machine back down onto the caster
wheels and remove the jack. Raise the mower
deck to the transport position and remove the
wooden blocks.
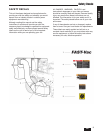
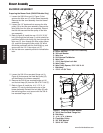
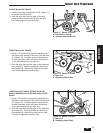
Figure 2. Location of Ball Joint
A. Ball Joint To Be Replaced
A
MEASURE HERE
Figure 3. Measure Threads
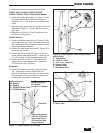
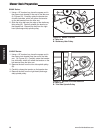
Figure 4. Ball Joints
A. Frame
B. Existing Ball Joint
C. Jam Nut
D. Suspension Arm
E. 3/4” Bolt
F. Ball Joint Provided In Kit
G. 3/4”Washer Provided In Kit
H. Spacer, .75 x 1.75 x 1.00
I. Spacer, .75 x 1.00 x .25
B
C
D
F
C
E
D
A
A
7
G
GB
H
I