


9
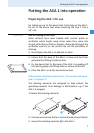
Putting the ASA 1 into operation
For rack mounting the ASA 1, you require (see “Accessories and
spare parts” on page 17):
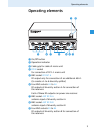
• the GA 3 19“ rack adapter
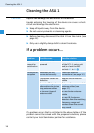
Rack mounting
one ASA 1
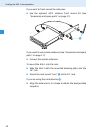
̈ Unscrew and remove the two recessed head screws (M4x8)
on one side of the ASA 1.
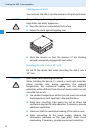
̈ Hold one rack mount “ear” to the ASA 1.
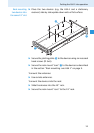
̈ Secure the rack mount “ear” ¸ to the side of the ASA 1
using the two recessed head screws.
̈ Repeat for the other rack mount “ear” as described above.
̈ Secure the blanking plate ¹ to one of the rack mount
“ears” ¸ using two recessed head screws (M 6x10).
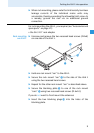
If you do not want to front mount the antennas:
̈ Insert the two blanking plugs Ƹ into the holes of the
blanking plate.
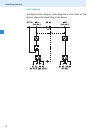
̈ When rack mounting, please note that intrinsically harmless
leakage currents of the individual mains units may
accumulate, thereby exceeding the allowable limit value. As
a remedy, ground the rack via an additional ground
connection.
¸
¸
¹
Ƹ