


16
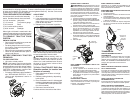
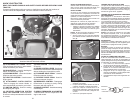
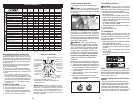
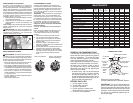
TO ADJUST MOWER CUT TING HEIGHT
The po si tion of the at tach ment lift le ver (A)
de ter mines the cut ting height.
• Put attachment lift lever in desired cutting
height slot.
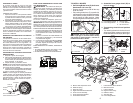
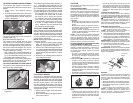
TO MOVE FORWARD AND BACKWARD
The direction and speed of movement is
controlled by the forward and reverse drive
pedals.
1. Start tractor and release parking
brake.
2. Slowly depress forward (K) or reverse(L)
drive pedal to begin movement. Ground
speed increases the further down the
pedal is depressed.
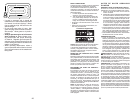
TO USE CRUISE CONTROL
The cruise control feature can be used for
forward travel only.
SYSTEM CHARACTERISTICS
The cruise control should only be used
while mowing or transporting on relatively
smooth, straight surfaces. Other con di tions
such as trimming at slow speeds may cause
the cruise control to dis en gage. Do not use
the cruise control on slopes, rough terrian
or while trimmimg or turning.
• With forward drive pedal depressed to
desired speed, pull cruise control lever
(J) up and hold while lifting your foot off
the pedal, then release the lever.
To disengage the cruise control, depress the
brake pedal, tap on forward drive pedal or
push the cruise control lever down.
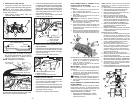
TO ADJUST GAUGE WHEELS
Gauge wheels are prop er ly ad just ed when
they are slight ly off the ground when mower
is at the desired cutting height in operating
position. Gauge wheels then keep the deck
in proper position to help prevent scalping
in most terrain conditions.
NOTE: Adjust gauge wheels with tractor on
a flat level surface.
1. Adjust mower to desired cutting height
(See “TO AD JUST MOWER CUT TING
HEIGHT” in this sec tion of manual).
2. With mower in desired height of cut po si-
tion, gauge wheels should be assembled
so they are slightly off the ground. In stall
gauge wheel in ap pro pri ate hole. Tighten
se cure ly.
3. Repeat for all, installing gauge wheel in
same adjustment hole.
J
L
K
The cutting height range is ap prox i mate ly 1"
to 4". The heights are measured from the
ground to the blade tip with the engine not run-
ning. These heights are approximate and may
vary depending upon soil conditions, height
of grass and types of grass being mowed.
• The average lawn should be cut to ap-
proximately 2-1/2" during the cool sea-
son and to over 3" during hot months.
For healthier and better looking lawns,
mow often and after moderate growth.
• For best cutting performance, grass over
6 inches in height should be mowed
twice. Make the first cut relatively high;
the second to de sired height.
TO OPERATE MOWER
Your tractor is equipped with an operator
presence sensing switch. Any attempt by the
operator to leave the seat with the engine
running and the attachment clutch engaged
will shut off the engine. You must remain
fully and centrally positioned in the seat to
prevent the engine from hesitating or cutting
off when operating your equipment on rough,
rolling terrain or hills.
1. Select desired height of cut with attach-
ment lift lever.
2. Start mower blades by engaging attach-
ment clutch control.
A
57
TRACTOR
Siempre observe las reglas de seguridad cuando
dé man te ni mien to.
OPERACIÓN DEL FRENO
Si el tractor necesita más de cinco (5) pies para
detenerse a la máxima velocidad al cambio más
alto en una superficie nivelada, de hormigón o
pavimentada, hay que hacerle el servicio al freno.
Ver “PARA VERIFICAR SI FUNCIONA BIEN EL
FRENO” en el capítulo de Servicio y ajustes de
este manual.
LLANTAS
• Mantenga todos los neumáticos con la presión
de aire adecuada (Ver la PSI que se indica en
estos).
• Mantenga las llantas sin gasolina, aceite o
substancias químicas para control de insectos
que pueden dañar la goma.
• Evite los tocones, las piedras, las grietas pro-
fundas, los objetos afilados y otros peligros que
pueden dañar a las llantas.
AVISO: Para arreglar las llantas perforadas
y péra prevenir que tenga llantas pinchadas a
causa de pequeñas fugas, puede comprar el
sello para llantas de su comerciante de partes de
repuesto más cercano. Elsello previene que las
llantas se sequen y también la corrosión.
SISTEMA PRESENCIA OPERADOR Y SISTEMA
FUNCIONAMIENTO ATRÁS (ROS)
Asegurarse de que el sistema de presencia del
operador, el sistema de trabajo y el sistema fun-
cionamiento atrás funcionen bien. Si tu tractor
no función como descrito, reparar el problema
inmediatamente.
• El motor no arrancará si el pedal de embra-
gue/freno está completamente presionado
y
el mando del embrague del accesorio está
desconectado.
VÉRIFIÉZ SISTEMA PRESENCIA OPERADOR
• Cuando el motor está en marcha, cualquier
tentativa del operador de abandonar el asiento
sin haber puesto el freno de estacionamiento
primero, apagará el motor.
• Cuando el motor está en marcha y el embra-
gue del accesorio está conectado, cualquier
tentativa del operador de abandonar el asiento,
apagará el motor.
• El embrague del accesorio no tendría que funcio-
nar nunca si el operador no está en su asiento.
VÉRIFIÉZ SISTEMA FUNCIONAMIENTO ATRÁS
(ROS)
•Cuando el motor está en marcha con el inte-
rruptor de llave en posición de motor “ON” y el
embrague del accesorio conectado, cualquier
tentativa del operador de viajar marcha atrás,
apagará el motor.
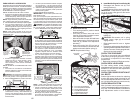
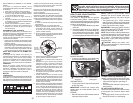
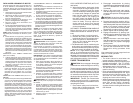
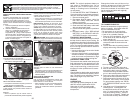
REMOCIÓN DE LA CUCHILLA
1. Levante la segadora a su posición más alta
para permitir el acceso a las cuchillas.
AVISO: Proteja sus manos con guantes y/o
envuelva la cuchilla con una tela gruesa.
2. Remueva el perno de la cuchilla dandole vueltas
en el sentido inverso al de las agujas del reloj.
3. Instale la nueva cuchilla o cuchilla afilada con
el estampado “THIS SIDE UP” en la direccion
de la segadora y del conjunto del mandril.
IMPORTANTE: Para asegurar la instalacion ap-
ropiada, posicione el agujero central de la cuchilla
con la estrella del conjunto del mandril.
4. Instale y apriete el perno de la cuchilla firme-
mente (Par 45-55 pies/libras).
IMPORTANTE: El perno de la cuchilla es tratado
a calo. Si es necessario sustituir los pernos, sus-
tituirlos sólo con pernos aprobados mostrados en
Partes de Reparación.
BATERÍA
Su tractor cuenta con un sistema de carga de la
batería que es suficiente para el uso normal. Sin
embargo, si se carga la batería periódicamente,
con un cargador de automóviles, se prolongará
su duración.
• Mantenga la batería y los terminales limpios.
• Mantenga los pernos de la batería apretados.
• Mantenga los agu je ros de ventilación peque-
ños abiertos.
• Vuelva a cargar de 6-10 amperes por 1 hora.
AVISO: La bateria del equipo original de su
trac tor no becesita servicio. No intente abrir o
remover las tapas o cubiertas. No esnecesario
añadir o verificar el nivel del electrólito.
•Cuando el motor está en marcha con el inte-
rruptor de llave del sistema de funcionamiento
atrás (ROS) en la posición “ON” y el embrague
del accesorio conectado, cualquier tentativa del
operador de viajar marcha atrás, NO apagará
el motor.
CUIDADO DE LA CUCHILLA
Para obtener resultados óptimos, las cuchillas de
la cortadora deben estar afiladas. Reemplace las
cuchillas que estén gastadas, dobladas o dañadas.
PRECAUCIÓN: Usar solamente la hojas
de repuesto aprobada por el fabricante de su
cortacésped. Usar una hoja no aprobada por el
fabricante de su cortacésped es peligroso, puede
dañar su cortacésped y anular su garantía.
0
2
8
2
8
Posición ROS “ON”
Motor en posición “ON”
(Operación Normal)
Conjunto del
Mandril
Cuchilla
Estrella
Agujero
Central
Perno de la
Cuchilla