


R
Section 6
25
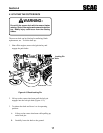
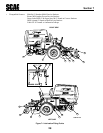
1. Shut off the mowers engine and engage the parking
brake.
2. Loosen the two bolts for each steering handle and pivot
the handles forward or back as desired.
3. Keep the handles aligned and tighten the bolts.
4. Maintain gap between steering handles. If gap does
not exist, contact your authorized Scag service center.
6.3 THROTTLE CONTROL AND CHOKE
ADJUSTMENTS
These adjustments must be performed by your Scag dealer
to ensure proper and efficient running of the engine. Should
either need adjustment, contact your authorized Scag
service center.
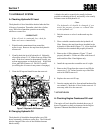
6.4 BELT ADJUSTMENT
All drive belts and cutter deck belts are spring loaded and
self-tensioning. The belts should be checked periodically
for proper alignment and wear.
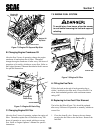
WARNING:
Before removing any guards, shut the
engine off and remove the ignition key.
6.5 BELT ALIGNMENT
Belt alignment is important for proper performance of
your Scag mower. If you experience frequent belt wear
or breakage, see your authorized Scag service center for
belt adjustment.
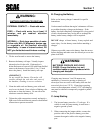
6.6 CUTTER DECK ADJUSTMENTS
The mower deck can be adjusted from a height of 1-1/2-
inches to 5-inches at 1/2-inch intervals. To adjust the
cutting height:
Do not adjust the cutting height with the cutter
blades rotating. Shut the engine off and remove
the key from the ignition. Bodily injury could
occur from the rotating blades.
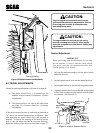
WARNING:
1. Shut off the engine and remove the key from the ignition.
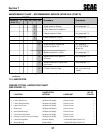
2. Remove the hairpins from the adjusting pins on one side
of the cutter deck. See Figure 6-7.
3. Lift or lower the deck to the desired cutting height by
using the handles supplied on the cutter deck. See Figure
6-6. Reinstall the hairpins at the desired cutting height.
A deck height decal is located on the deck mounting
frame as an aid in adjusting the deck to the desired
height.
4. Repeat the above process for the other side of the cutter
deck.
NEVER engage the cutter deck without the belt
cover in place.
WARNING:
5. Cutter deck pitch is adjusted by loosening the locknut
on each of the front cutter deck height adjuster pins
and turning the pins until 1/4" pitch (front edge of cutter
deck is 1/4" lower than the rear edge of the cutter deck)
is achieved. Tighten the locknuts securely once the
proper adjustment has been set.
Figure 6-7 Cutter Deck Adjustment
Remove Pins
Rear Adjuster Pin
Handle
SCR 2K CDA